Configuring the mvTelnet Server
This procedure adds, deletes or (re)configures an mvTelnet Server, and
defines the mvBase line number(s), the maximum quantity of connections,
the TCP port(s) used and the mvBase Server(s) to which Telnet clients
connect (via mvTelnet).
Perform these steps to add or (re)configure an mvTelnet
Server:
Launch or switch to the
Administration Utility.
IMPORTANT |
Full administrator rights are
required for access to the Administration Utility in Windows. |
Select the Workstation
tab if it is not displayed in the foreground.
Verify that the Run As
progress indicator displays a status of Stopped. The Workstation Application
or the Service must display Stopped or Not Installed.
If the status displays Started, the Workstation
must be stopped. Select the Workstation Run As mode, then select
Stop.
Respond Yes to the confirmation (Admin) dialog
box.
Select Configure. The Configuring Workstation property
sheet activates, listing the network name of the current system in
the title bar.
Select the Telnet Servers tab. The Telnet Servers
tab displays, listing the currently configured Telnet servers. This
area appears blank if no servers are configured.
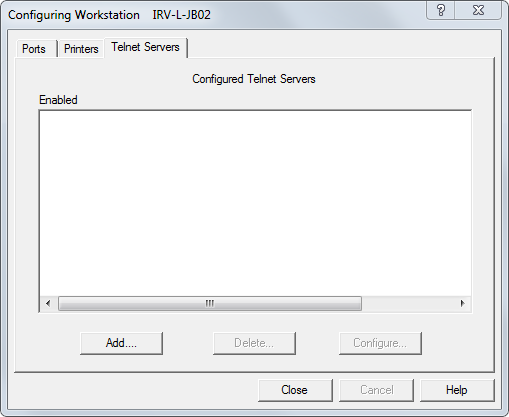
This tab contains three buttons to use for configuring mvTelnet
Servers:
Add |
Invokes the Telnet Servers dialog
box, allowing the addition and configuration of mvTelnet Servers
not already configured for use by the Workstation. |
Delete |
Removes the
selected (highlighted) Telnet Server from the mvBase Workstation. |
Configure |
Invokes the
Telnet Servers dialog box, allowing the modification of Telnet
servers already configured for use by the Workstation. Select
the pertinent Telnet Server prior to using this button. |
NOTE |
The Add and Delete buttons of
the Telnet Servers tab are disabled (shaded) when the Workstation
is running. If these buttons are disabled, stop the Workstation
prior to configuration of Telnet server(s). Be aware that
stopping the Workstation may affect connected clients. Shut
down clients if necessary prior to proceeding. |
Perform these steps to delete an existing mvTelnet
Server:
Select the mvTelnet Server from the Configured
Telnet Servers field.
Select Delete.
If you now wish to configure a new or existing
mvTelnet Server, proceed to step 7 or 8.
If you are finished, select OK. The Workstation
tab displays.
To add a new mvTelnet Server to mvBase, select Add.
The Telnet Servers dialog box displays. Proceed to step 9.
To configure an existing Telnet Server, select the
Telnet Server from the Configured Telnet Servers field, then select
Configure. The Telnet Servers dialog box displays. Proceed to step
9.
Configure the Telnet Servers dialog box.
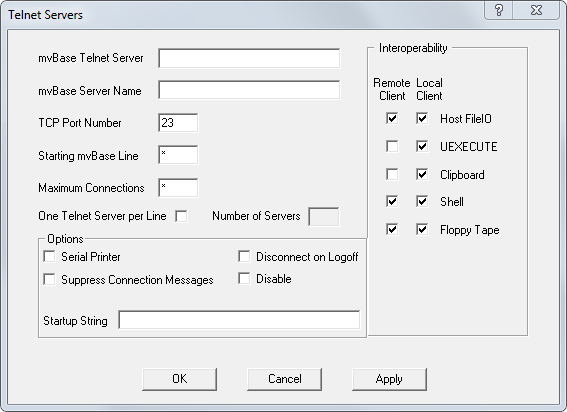
In the mvBase Telnet Server field, enter the name
of the mvTelnet Server you are adding (only if you selected the Add
button). mvTelnet Servers can now be defined by a custom name (e.g.
West Coast Connections) rather than just by a numeric name (e.g. Telnet001).
This allows users to be much more specific about the location or function
of each mvTelnet Server.
In the mvBase Server Name field, enter the network
name of the system running the mvBase Server (required).
In the TCP Port Number field, enter the TCP/IP port
number on which the mvTelnet Server will listen for Telnet clients.
The field fills in automatically with 23, the standard Telnet port.
Change this entry if required, for example, when port 23 is already
being used. If a port other than port 23 is designated, the number
must be 2000 or greater. Note that this is a TCP/IP port, not a COM
port.
NOTE |
When
configuring multiple mvTelnet Servers on a Workstation, this field
will prevent TCP port conflicts only on the Workstation being
configured. TCP port conflicts with other programs will not be
prevented. |
If you are configuring multiple mvTelnet
Servers, each Server must be configured with its own TCP port. mvTelnet
Servers then may connect simultaneously to either the same or different
mvBase Servers.
In the Line Number field, enter the beginning line
number (to the mvBase Server) by which the mvTelnet Server attempts
to connect. Entering an asterisk (*) indicates a wildcard line (the
first available line, with the search starting at line 0).
This input field does not specify the quantity
of mvBase lines to be used for Telnet client connection, but:
You may type * (asterisk) or -1 to take any
available line. If you specify * or -1 in this field, mvTelnet connects
to the next available line(s).
When configuring mvTelnet to connect the
TCP port to a specific line or lines on an mvBase Server, you must input
the first (or only) mvBase line allocated to Telnet clients on that server.
NOTE |
When
a TCP port is to be allocated to one or more specific mvBase lines,
Rocket recommends following the guidelines in the section Coordinating Line Configuration for
Multiple Client Types, contained in the mvBase
Installation Guide or the mvBase
Release Notes. |
In the Max Connections field, enter the number of
consecutive mvBase Server lines to attempt a connection. This field
specifies the quantity of Telnet connections configured to this mvTelnet
Server. If an * (asterisk) or -1 is specified in this field, the mvTelnet
Server will allow as many connections as available lines. If there
is a numeric entry in the Line Number field, there must be a numeric
entry in the Max Connections field.
Select or clear the One Telnet Server Per Line option.
If selected, this option configures one TCP/IP port number per mvBase
Server line. This option is used in conjunction with the Number of
Servers option. When selected, each mvTelnet Server has one line per
TCP port. The mvBase Server Name will be used for all mvTelnet Servers,
and the line numbers and TCP ports used are consecutive, beginning
with the values entered in the Starting mvBase line and TCP Port Number
fields, respectively.
If necessary, enter a value in the Number of Servers
field. This value determines the number of mvTelnet Servers to create
with one line per TCP port.
Complete the necessary values in the Options field.
This field defines general functions of this mvTelnet configuration.
Serial
Printer |
Select
this box for an mvTelnet Server connecting to a (serial) printer.
This box identifies this mvTelnet Server as supporting a serial
printer. Connections identified this way support output only with
no input allowed, and do not consume an mvBase user license. |
Suppress
Connection Method |
Select this box
to prevent any connection messages from being sent to the mvBase
client. |
Disconnect
on Logoff |
Select this box
to automatically disconnect on logoff. |
Disable |
Select this box
to make this mvTelnet Server definition inactive upon startup
of the mvBase Workstation. This function is particularly useful
when you want to retain the current configuration's settings for
future use. |
Startup
String |
Specifies a sequence
of information (for example, logon strings and commands to execute)
to be automatically entered when a connection is made to the socket.
A comma represents a carriage return. Note that this feature was
introduced in mvBase 3.1 and is not available on mvBase 3.0 and
prior. |
Select the desired interoperability settings in the
Interoperability field in order to define the Telnet client's access
to system resources on the system running the mvBase Workstation.
Remote and local (Telnet) clients are determined in relation to the
mvTelnet Server (the Workstation system).
Select features in the Remote column to activate
the interoperability feature if the Telnet client is remote with
respect to the mvTelnet Server.
Select features in the Local column to activate
the interoperability feature if the Telnet client is local with
respect to the mvTelnet Server.
Host
File IO |
Select
this option to enable UEXECUTE
commands from mvBASIC on the system that is running the mvBase
Workstation. Enables use of the UOPEN
statement within mvBASIC. Once opened, other UCOMMANDS
are available for use. See the mvBASIC
User Reference Guide for additional documentation about
the UOPEN
command. |
UEXECUTE |
Select this option
to enable UEXECUTE commands from
mvBASIC on the system that is running the mvBase Workstation.
See the mvBASIC User Reference
Guide for additional information about the UEXECUTE command. |
Clipboard |
Select this option
to enable the Windows Clipboard application on the system running
the mvBase Workstation. |
Shell |
Select this option
to enable Shell(!) (access the command prompt) on the system running
the mvBase Workstation. |
Floppy
Tape |
Select this option
to enable access to the floppy tape on the system running the
mvBase Workstation. |
Once required fields and desired interoperability
features are defined, select OK. The system returns to the Telnet
Servers tab, and the Configured Telnet Servers field lists the mvTelnet
Server(s).
In the future, if you wish to identify the
name of the system pertaining to the TELNET001 Server or other Servers,
select that Server (i.e., TELNET001), then select Configure. This displays
the specific network name and configuration of that TELNET001 Server.
Select Cancel to return to the Telnet Servers tab without disrupting the
current configuration.
NOTE |
Beginning
with Release 1.3.x, the naming of mvTelnet Servers is user-definable,
and you are not required to follow the naming convention of TELNETxxx. |
To add more Telnet servers, or to (re)configure existing
Telnet servers listed in this tab, repeat the steps above. When all
desired Telnet servers are added and/or configured, proceed to the
next step.
Select OK in the Telnet Servers tab. The Workstation
tab displays.
Perform one or more of these tasks in this sequence
to start the mvBase Workstation:
Ensure that the mvBase Server is already started.
Configure additional client connections in the
mvBase Workstation (if necessary).
Start the mvBase Workstation once you have configured
all client connections.
mvTelnet Server configuration is complete.
The Telnet server continues to run and accept client requests as long
as there are mvBase lines available. The mvTelnet Server terminates and
all open Telnet sessions disconnect when the mvBase Workstation Application
or Service is stopped. At that point, mvTelnet is no longer running.
See Also
Configuring
and Using the mvTelnet Server
mvTelnet Server Considerations
Licensing Telnet Clients
Setting Up Serial
Printers on TCP Ports
Connecting/Disconnecting
Telnet Clients
Telnet Client
Screen and Keyboard Options
Using the Options Tab