Physically connect the printer to the serial port. Before you connect a serial printer to the mvBase system, you need this information about the printer:
Printer type and model number
Baud rate(s) and parity used
Buffer size, if any
Protocols supported (X-ON, DTR, etc.)
Any options required
Baud rate establishes the speed of the transmission in bits per second. Both the printer and the communications line must be set to the same baud rate.
Choose and implement a method for handshaking. There are three options for handshaking. Details are documented in Configuring and Using mvBase Printers.
DTR (Data Transmit Ready)
X-ON/X-OFF
Padding
Using the PROTOCOL command, define the communications protocols for that printer connection.
Launch or switch to the Administration Utility.
Select the Workstation tab.
Select Configure. The Configuring Workstation dialog box displays.
Select the Telnet Servers tab. If your system has previously configured mvTelnet Servers, they display in the Configured Telnet Servers field.
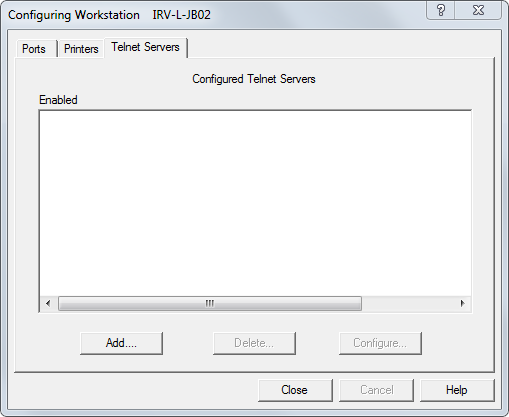
If the Telnet server to be associated with the serial printer has been configured previously, select that Telnet server, then select Configure. If the Telnet server to be associated with the serial printer has not been configured previously, select Add. The Telnet Servers dialog box displays with selection of Add or Configure.
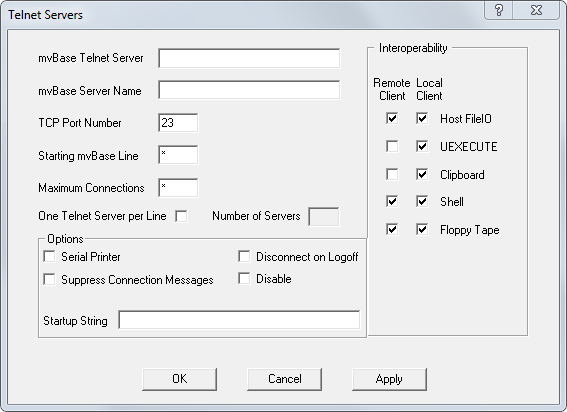
With mvBase Releases 1.3.00 or later, type the name of this mvTelnet Server in the mvBase Telnet Servers tab.
Type the name of the mvBase Server in the mvBase Server Name field. This designates the computer name of the mvBase Server system associated with this client.
Select Serial Printer in the Options field. Selection of the Serial Printer option forces the Max Connections field to 1. Do not change this entry value.
In the TCP Port Number field, enter the TCP port number. The port number may be port 23, or any port between 1024 and 5000.
In the Starting mvBase line field, type the first (or only) mvBase line number. This field must be filled with a numeric value. Rocket generally recommends that printer(s) be allocated the highest line number(s) available to reduce potential conflict with line consumption by wildcard clients.
Select OK. The connection defined by this mvTelnet Server now functions with a serial printer on the other end of the connection (whenever the Workstation is started). If * or any non-numeric character was typed in the Max Connections field, a message displays advising you of required change in input for this field.
Perform one or more of these tasks in this sequence to start the mvBase Workstation:
Ensure that the mvBase Server is already started.
Configure additional client connections in the mvBase Workstation (if necessary).
Start the mvBase Workstation once you have configured all client connections.