After the D3 package is loaded, a D3 installation script executes to generate a configuration file. If the configuration file /usr/lib/pick/pick0 already exists, the D3 Installation menu displays. For a new installation, the D3 Installation menu displays, using the default configuration file.
NOTE |
If the installation program modifies the pick0 file, it will put a backup copy of that file in the /tmp directory under the name sav.pick-.x. |
See these topics for menu and configuration specifics:
Display/Modify D3 Configuration Menu
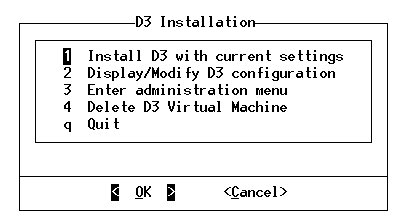
To proceed with the installation process from the D3 Installation menu:
Select the Display/Modify D3 configuration option.
The menu below displays:

Review each menu option and the corresponding default configuration value displayed using the values entered in the worksheet located in the Installation Worksheet.
To accept the default configuration, enter 0 to return to the D3 Installation menu.
Proceed to the next section, Installing D3 With the Chosen Settings.
To change the default configuration:
Select the menu item to change.
Note that selecting the D3 virtual disk option displays the D3 virtual disk menu. See D3 Virtual Disk Menu for a discussion of this menu and its options.
Enter the new value.
Use the values recorded in the Installation Worksheet.
Consult Display/Modify D3 Configuration Menu for menu option descriptions.
Enter 0 after all desired configuration changes are made to return to the D3 Installation menu.
Proceed to the section, Installing D3 With the Chosen Settings.
NOTE |
The installation process removes comment lines from any existing configuration file, usually /usr/lib/pick/pick0. |
See Also
Installing D3 With the Chosen Settings
Starting the D3 Virtual Machine