 Connecting to the Host
System
Connecting to the Host
System Connecting to the Host
System
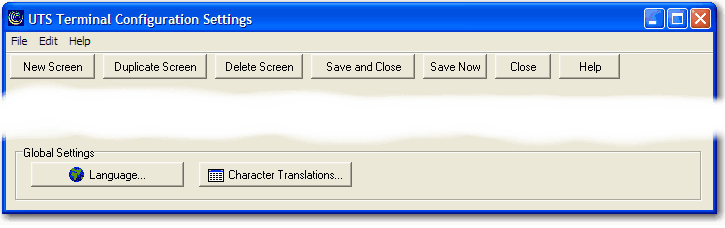
The UTS Terminal Configuration Settings dialog contains configuration options that assign the communication route to be used when the screen is opened, assign printers to and set general appearance options for the screen.
From the BlueZone MenuBar, choose Session:Configure. The Session Configuration dialog will appear.
Click the Configure button located to the right. The UTS Terminal Configuration Settings dialog will now be displayed.
The following screen shot is an example of the default UTS Terminal Configuration Settings dialog before any Screens are created:
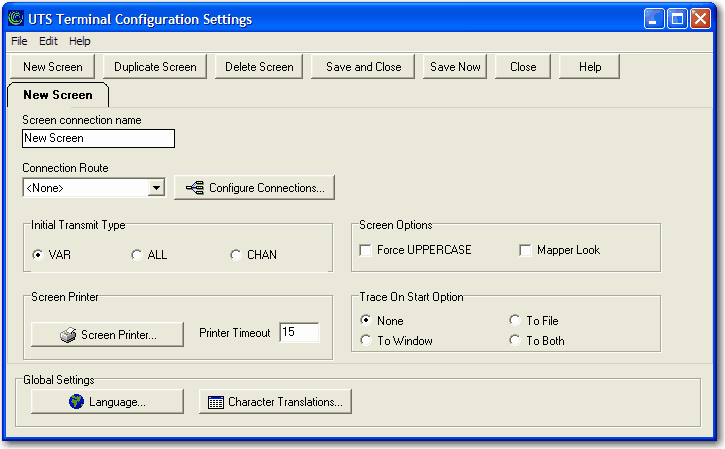
The following screen shot is an example of the T27 Terminal Configuration Settings dialog after one Screen has been created.
These are the menu items that appear across the top of the dialog:
File
Save: Saves the current screen.
Save and Close: Saves the current screen and closes the dialog.
Show Paths: Displays a dialog that contains the path information where BlueZone UTS is installed.
Close: Closes the dialog. You will be prompted to save any changes that you may have made.
Edit
New Screen: Creates a new screen.
Duplicate Screen: Used to duplicate an existing screen.
Delete Screen: Used to delete an existing screen.
Help
About: Launches the About dialog which contains the name of the product and the version number.
These are the buttons that appear across the top of the dialog:
New Screen: This button is used to create a new screen.
Duplicate Screen: This button is used to duplicate an existing screen.
Delete Screen: This button is used to delete an existing screen.
Save and Close: This button is used to save the current screen and close down the UTS Terminal Configuration Settings dialog.
Save Now: This button is used to save the current screen.
Close: This button is used to close the UTS Terminal Configuration Settings dialog.
Help: This button is used to launch the help system.
The controls in this group link a screen to a particular route.
Screen Connection Name ----
Choose a name for the screen you wish to configure. Up to 24 screens may be configured. To make additional screens, click the New Screen button. You can also duplicate and delete screens form this dialog.
Connection Route ----
From this drop-down list box, select a configured route to be used when the screen is opened. If additional routes are required, use the Configure button on any screen tab.
Configure Connections: Click this button to configure the routes, open IDs. and virtual destinations required to connect to a host
 NOTE Each
screen in use should have its own configured route.
NOTE Each
screen in use should have its own configured route.
 SEE How
to Configure Connections for help with configuring host connections.
SEE How
to Configure Connections for help with configuring host connections.
When complete, use the Connection Route drop-down list box to link a newly configured route to the selected screen.
Initial Transmit Type ----
BlueZone UTS emulation provides three modes of transferring data from the terminal screen to the host processor: VAR (Variable), ALL, and CHAN (Changed). The current transmission mode is set in the XMIT() field in the terminal control page. Most host programs expect the terminal to be operated in the VAR transmit mode. If your application requires an initial mode other than VAR, set it here and BlueZone UTS will initialize the XMIT() field with that value.
VAR (Variable)
ALL
CHAN (Changed)
Screen Options ----
Force UPPERCASE: Checking this box causes BlueZone UTS to translate lower case characters that are typed to their uppercase equivalents.
Mapper Look: Check this box to set BlueZone UTS for “Mapper Look and Feel” processing. With Mapper Look checked, four of the display characteristics of BlueZone UTS will change as follows:
If a line contains an ASCII Tab Code in the first column, that line is considered a “Tab Line”. Tab codes are displayed using the graphic vertical bar (|) that produces a visual column separator for your report.
The only control characters displayed will be the Start-of-Entry (SOE), the standard Tab Code, and the Mapper Tab Code. Characters such as Form-Feed and Line-Feed are displayed as spaces.
A protected field (function key name on the last row of the Mapper screen) can be transmitted by clicking with the mouse. This is compatible with the function key lines produced by Mapper 2200 level 35.
BlueZone UTS will also support special Mapper box drawing sequences sent from the host.
NOTE When
Mapper Look is used, the Mapper station must be configured as a terminal
type of “PCE” with an option of “S” (Mapper Look and Feel), or as a terminal
type of “6S”.
Screen Printer ----
The button in this group allows a configured printer in the printer pool to be assigned to one of three printer DIDs for the screen.
Screen Printer: Use this button to assign up to three printers for the screen.
SEE
How
to Configure the Screen Printer for
help with configuring the Screen Printer.
Printer Timeout: Use this text box to specify how long the emulator will wait for additional print data before automatically closing the printer. The default is 15 seconds.
-1 (or any negative value) = No timeout,
0 = Timeout immediately after printing,
n (any positive number) = Timeout n seconds after printing.
Trace On Start Option ----
The controls in this group determine what trace activity is to take place, if any, when the screen is first opened.
None: When this option is set, no tracing activity will take place.
To Window: When this option is chosen, a separate trace window will open to display the trace.
To File: This option will cause the Emulator TraceFile dialog to open when the screen is opened. In this dialog, enter the text file name for the trace file. The trace file is normally stored in C:\Documents and Settings\<username>\Local Settings\Temp directory and will have a .txt extension.
To Both: Select this option to trace to a window and file.
Global Settings ----
Language: Click this button to select the desired single-byte or multi-byte language character set.
Character Translations: Click this button to open the BlueZone UTS Character Translation Configuration dialog. This dialog provides the ability to select and edit character translation sets for specific countries.
SEE How
to Configure Character Translation
for more detailed information.
Related Topics: