 Connecting to the Host
System
Connecting to the Host
System Connecting to the Host
System
Use the Screen Printer Device Assignments dialog to assign a locally defined printer to one of three screen DIDs.
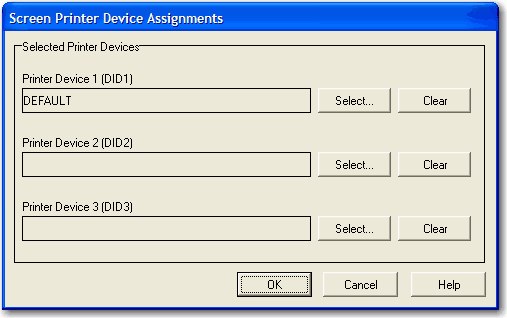
Printer Device 1 through Printer Device 3 (DID1 through DID3)
The controls in this group allow you to attach local printer definitions to one of three screen DIDs. The three DIDs correspond to the AUX DIDs configured for the route chosen for the screen. You configure the route by pressing the Configure Routes button on the Globals tab.
Select Printer Devices ---
Select: Use this button to initiate the Terminal Printer Setup dialog. With this selection, you may assign a previously configured local printer or create a new printer definition from all printers installed on your PC.
Clear: Use this button to detach the local printer definition from the DID.
OK: Clicking the OK button saves all changes made in this window and closes the window.
Cancel: Clicking the Cancel button closes this window and discards all changes made since it was last opened.
Help: Receive on-line help for this window.
Use the Terminal Printer Setup dialog to maintain local printer definitions. In BlueZone UTS, you can configure a pool of printers that can be used by BlueZone UTS screens. Printers can be configured more than once (one for normal Windows printing, one using passthrough printing, one to use a different font, one to use a different page orientation, etc.). You then assign configured printers to each screen's printer DIDs as needed. If no printer is assigned, the Windows default printer will be used.
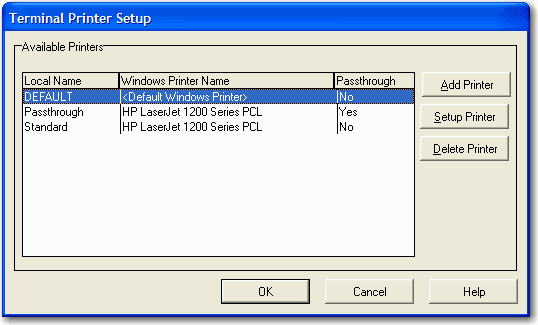
Available Printers ---
Add Printer: Use this button to add a new local printer name and definition. The name may be any meaningful name that uniquely identifies the local printer.
Setup Printer: After selecting an existing name from the Available Terminal Printers list box, use this button to edit the definition.
Delete Printer: After selecting an existing name from the Available Terminal Printers list box, use this button to delete the definition.
OK: Clicking the OK button saves all changes made in this window and closes the window.
Cancel: Clicking the Cancel button closes this window and discards all changes made since it was last opened.
Help: Receive on-line help for this window.
The Printer Device Selection and Setup dialog contains controls to equate an installed printer on the PC to a local printer name, use of a local print object, set special UTS print characteristics such as passthrough printing or assign Windows print settings.

Printer Selection ---
Controls in this group are used to assign a printer or text file and optionally assign a local print object, specify passthrough printing and the print line wrap option.
Local Printer Name: The read-only box contains the name of the local printer.
Standard Printing Devices ---
Selected Printer: Select a printer from this drop-down list box. This box contains a list of all printers installed through Windows on your PC plus a selection (<text file>) for directing printing to a text file on your PC.
Use Passthrough Printing: Check this box if the local printer is to be used for passthrough printing (see Passthrough Print Settings, below).
Do Not Wrap Print Lines: Check this box if long print lines are to be truncated rather than wrapped to the next line. The number of characters that will be truncated or wrapped depends upon the font, font style and font size selected for the printer and the page width chosen.
Windows Print Settings ---
The controls in this group are available for standard Windows printing (i.e., when the Use Passthrough Printing checkbox is not checked).
Printer Font: Use these controls to select the font, character set and orientation for standard windows printing.
Font Name: From this drop-down list box, select an installed font for printing.
Size: With this spin box, choose the appropriate font size.
Bold Face: Check this box if the print font is to be in boldface type.
Character Set: From this drop-down list box, select the desired character set.
Portrait: Choose this option to print so that the short edge is the top of the page.
Landscape: Choose this option to print so that the long edge is the top of the page.
Page Header Text: For normal printing (not passthrough), an option page header can be added. The heading line will only print if text is present.
If the Use Passthrough Printing checkbox is enabled, the Printer Device Selection and Setup dialog changes by displaying the Passthrough Print Settings dialog and eliminating the Windows Print Settings dialog shown above.
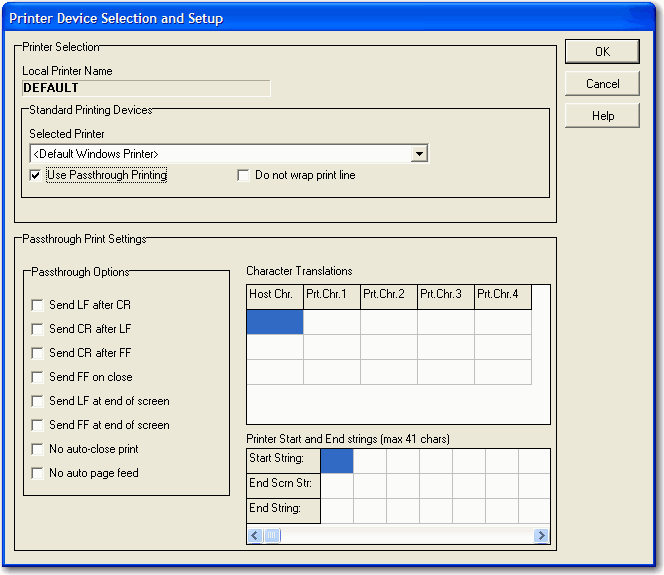
Passthrough Print Settings ---
The controls in this group are only available when the Use Passthrough Printing checkbox is checked.
Passthrough printing prints directly to a printer and may be useful in situations where the page oriented nature of Windows print management conflicts with the non-page orientation of some older TIP applications.
Whenever possible, you should print using standard Windows print management (the default). Windows controls all page formatting based on property settings for a configured print driver on your PC. In this instance, the host application must not send any page control commands (i.e., form feeds) to the printer.
When you bypass Windows print management and print directly to a printer, the host application program must supply all page control. BlueZone UTS simply passes all information directly through to a configured printer.
Passthrough Print Options ---
The options in this group control special line and form advancement.
Send LF after CR: Check this box to tell BlueZone UTS to use CR LF at the end of a line.
Send CR after LF: Check this box to tell BlueZone UTS to use LF CR at the end of a line.
Send CR after FF: Check this box to tell BlueZone UTS to use FF CR at the end of a line.
Send FF on Close: Check this box to tell BlueZone UTS to insert a FF at the close of the print.
Send LF at End of Screen: Check this box to tell BlueZone UTS to add an LF at the end of each screen.
 NOTE This
box should not be checked when using MAPPER AUX because MAPPER includes
an LF at the end of the screen (you would get one more line). Send
LF at End of Screen is for transactions that do not put in an LF, thus
causing the next screen's data to print starting at the end of the last
line.
NOTE This
box should not be checked when using MAPPER AUX because MAPPER includes
an LF at the end of the screen (you would get one more line). Send
LF at End of Screen is for transactions that do not put in an LF, thus
causing the next screen's data to print starting at the end of the last
line.
Send FF at End of Screen: Check this box to tell BlueZone UTS to add a FF at the end of each screen.
NOTE This
will send a Form Feed at the end of each screen or block from the host.
If the
host message does not include an EOMI status, this action is not taken,
allowing data from multiple screens to be printed without the form feed.
No Auto-close Print: Check this box to tell BlueZone UTS to keep the print open at the end of a print operation.
No Auto Page Feed: Check this box to tell BlueZone UTS not to perform a page eject after printing.
Character Translations ---
The entries in this table may be used to specify the ASCII characters that BlueZone UTS is to substitute when receiving special ASCII characters from the host.
Host Char.: In this column, enter the decimal representation of the anticipated ASCII host character.
Print Char.: 1 through Print Char. 4: In these columns, enter the decimal representation of the ASCII replacement character(s) to be sent to the printer.
Example of translating the tilde (~) to the Esc character:
Host Print
Char Char 1
126 27
NOTE If
additional rows are needed for translation, press the right mouse button
over the table and select Add Row from the drop-down menu with the left
mouse button. The
new row will be inserted at the bottom of the table. The
Delete Row item on the drop-down menu may be used to delete a selected
row.
Printer Start and End Strings (max 41 chars) ---
The entries in this box can be used to provide special starting and ending strings to be sent to certain printer devices. Up to 41 characters may be supplied for each string.
Start String: In this row, enter the decimal representations of the ASCII characters to be sent to the printer as a beginning string.
End Scrn Str: In this row, enter the decimal representation of the ASCII characters to be sent to the printer as an ending string at the end of each screen (when no EOMI present). If the End Screen string is present, the Send LF at end of screen and Send FF at end of screen are ignored.
End String: In this row, enter the decimal representations of the ASCII characters to be sent to the printer as an ending string.
Import: Click this button to import an existing passthrough print settings file.
Export: Click this button to export the passthrough settings to a file.
OK: Clicking the OK button saves all changes made in this window and closes the window.
Cancel: Clicking the Cancel button closes this window and discards all changes made since it was last opened.
Help: Receive on-line help for this window.