 Connecting to the Host System
 Connecting to the Host System
The T27 Terminal Configuration Settings dialog contains configuration options that assign the communication route to be used when the screen is opened, assign printers to, configure connection settings, configure datacomm options and configure keyboard options for the screen.
This dialog consists of the following parts:
From the BlueZone MenuBar, choose Session:Configure. The Session Configuration dialog will appear.
Click the Configure button located to the right. The T27 Terminal Configuration Settings dialog will now be displayed.
The following screen shot is an example of the default T27 Terminal Configuration Settings dialog before any Screens are created:

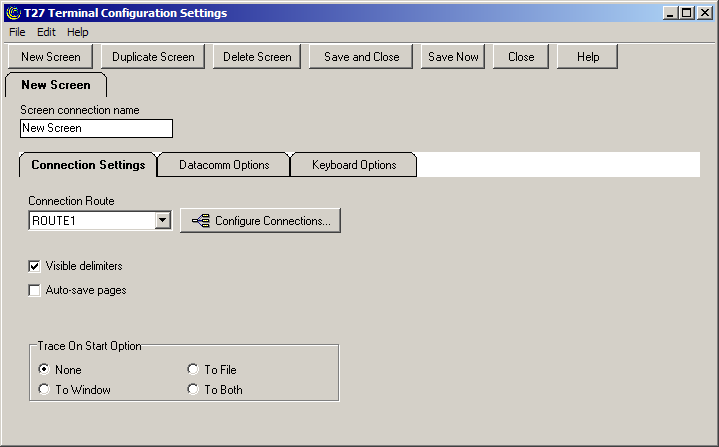
The following screen shot is an example of the T27 Terminal Configuration Settings dialog after one Screen has been created called New Screen, with the Connection Settings tab selected:

This dialog also contains the Connection Settings, Datacomm Options, and Keyboard Options tabs.
These are the menu items that appear across the top of the dialog:
Save: Saves the current screen.
Save and Close: Saves the current screen and closes the dialog.
Close: Closes the dialog. You will be prompted to save any changes that you may have made.
New Screen: Creates a new screen.
Duplicate Screen: Used to duplicate an existing screen.
Delete Screen: Used to delete an existing screen.
About: Launches the About dialog which contains the name of the product and the version number.
These are the buttons that appear across the top of the dialog:
New Screen: This button is used to create a new screen.
Duplicate Screen: This button is used to duplicate an existing screen.
Delete Screen: This button is used to delete an existing screen.
Save and Close: This button is used to save the current screen and close down the UTS Terminal Configuration Settings dialog.
Save Now: This button is used to save the current screen.
Close: This button is used to close the UTS Terminal Configuration Settings dialog.
Help: This button is used to launch the help system.
The controls in this group link a screen to a particular route.
Choose a name for the screen you wish to configure. Up to 24 screens may be configured. To make additional screens, click the New Screen button. You can also duplicate and delete screens form this dialog.
From this drop-down list box, select a configured route to be used when the screen is opened. If additional routes are required, use the Configure Connections button.
Configure Connections: Click this button to configure the routes, open IDs. and virtual destinations required to connect to a host
 NOTE Each
screen in use needs to have its own configured route.
 SEE How
to Configure Connections for more detailed information.
When complete, use the Connection Route drop-down list box to link a newly configured route to the selected screen.
Visible Delimiters: Enable to display field delimiters when in forms mode.
 SEE Toggle
Forms located in the Datacomm Options
tab below.
Auto-save Pages: When enabled, the contents of all pages in an environment are saved to disk when the environment is closed. The pages are then restored when the environment is re-opened.
 NOTE As
a result of this action, page one will be overwritten on start up.
The controls in this group determine what trace activity is to take place, if any, when the screen is first opened.
None: When this option is set, no tracing activity will take place.
To Window: When this option is chosen, a separate trace window will open to display the trace.
To File: This option will cause the Emulator TraceFile dialog to open when the screen is opened. In this dialog, enter the text file name for the trace file. The trace file is normally stored in C:\Documents and Settings\<username>\Local Settings\Temp directory and will have a .txt extension.
To Both: Select this option to trace to a window and file.
The options on this tab govern communications between the host and PC. Multiple options may be selected.
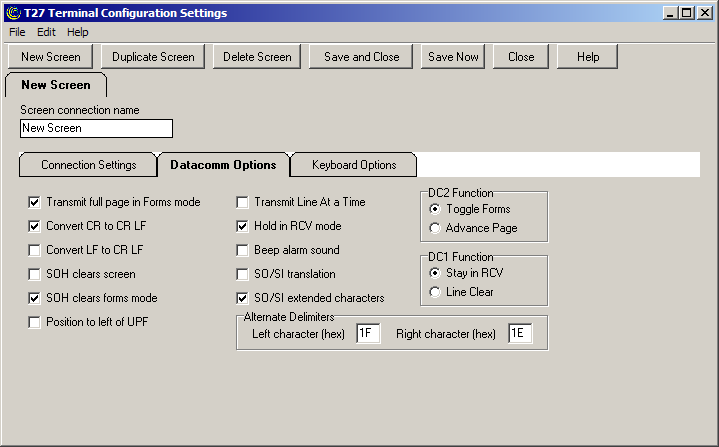
The following screen shot is an example of the T27 Terminal Configuration Settings dialog with the Datacomm Options tab selected.

Transmit Full Page in Forms Mode: Check this box to cause the full page to be transmitted to the host when in forms mode (see Toggle Forms, below). If this box is not checked, only the unprotected data from the home position to the cursor will be transmitted.
Convert CR to CRLF: Check this box to cause a line feed character to be appended to any carriage return character sent by the host application.
Convert LF to LFCR: Check this box to cause a carriage return character to be appended to any line feed character sent by the host application.
SOH Clears Screen: Check this box to cause the screen to be cleared upon receipt of an SOH character.
SOH Clears Forms Mode: Check this box to cause forms mode to be terminated upon receipt of an SOH character.
Position to Left of UPF: When this option is checked, the effect of the Home function places the text cursor to the first character position of a right justified, unprotected field; otherwise, the cursor will be moved to the data entry position, or rightmost position of the field.
Transmit Line at a Time: Check this box to force the normal Transmit to act like the Transmit Line key.
Hold in RCV Mode: Check this box to cause the screens to remain in receive mode after getting a message from the host application (see Stay in RCV, below).
Beep Alarm Sound: Checking this box turns audible beep on. If this box is not checked, no audible sound will be heard.
SO/SI Translation: Check this box to enable SO/SI (7-bit to 8-bit/8-bit to 7-bit) character translation on data transmitted to the host.
SO/SI Extended Characters: Check this box to enable SO/SI (7-bit-to-8-bit/8-bit-to-7-bit) character translation on data received from the host. This option is not required if the host transmission is prefixed by ESC SO sequences.
The mutually exclusively options in this group instruct BlueZone T27 how to interpret the DC1 character when received from the host.
Stay in RCV: Choose this option to keep the screens in receive mode upon receipt of a DC1 character. This option nullifies the Hold in RCV option (see above).
Line Clear: Choose this option to clear the line upon receipt of the DC1 character.
The option buttons in this group instruct BlueZone T27 how to interpret the DC2 character when received from the host.
Toggle Forms: Choose this option to toggle to/from forms mode upon receipt of the DC2 character.
Advance Page: Choose this option to stay in the current mode (forms or no-forms) and advance the DataComm pointer one position to the right upon receipt of the DC2 character.
In this group, enter the alternate delimiters sent by the host application. Use of alternate delimiters only applies when in forms mode.
Left Character (hex): In this text box, enter the hex character sent and interpreted as the beginning delimiter of left-justified unprotected fields. The default is the US character (1F).
Right Character (hex): In this text box, enter the hex character sent and interpreted as the ending field delimiter. The default is the RS character (1E).
The options on this tab govern keyboard actions. Multiple options may be selected.
 NOTE There
are additional keyboard options located on the Miscellaneous
tab in the Keyboard Options dialog.
 SEE Using
the Display Interface, Keyboard
Mapping, Unisys T27, T27 Miscellaneous Options for information
on the additional keyboard options.
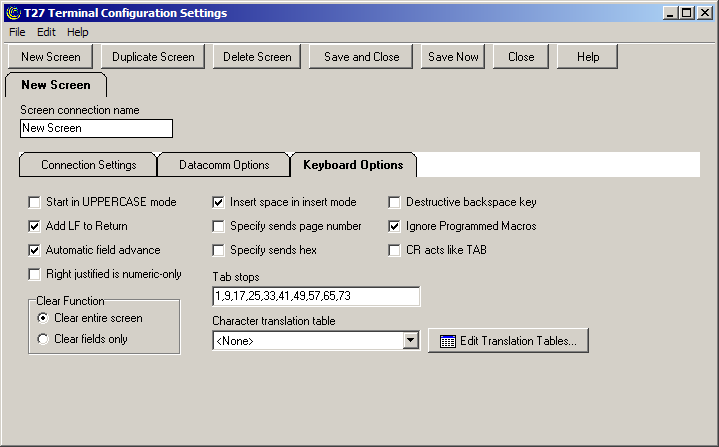
The following screen shot is an example of the T27 Terminal Configuration Settings dialog with the Keyboard Options tab selected.

Start in UPPERCASE Mode: Check this box to convert lowercase characters that are typed to their uppercase equivalents.
Add LF to Return: Check this box to cause a line feed character to be appended when the Carriage Return key (Enter) is pressed. If this box is not checked, only the carriage return is issued.
Automatic Field Advance: Check this box to advance the cursor automatically to the next field when the current field becomes full.
Right Justified is Numeric-Only: If this box is checked, only the characters 0-9, space, period (.) and comma (,) will be allowed in a right-justified field. If the box is not checked, any character will be accepted.
Insert Space in Insert Mode: Check this box to cause a space to be inserted whenever the Insert key is pressed.
Specify Sends Page Number: Check this box to cause the page number (in addition to the normal column and row designating the cursor position) to be sent the host application when the Specify key is pressed.
Specify Sends Hex: Check the box to cause the cursor position (column and row) to be sent in hexadecimal when the Specify key is pressed. When this box is not checked, the cursor position is reported in ASCII.
Destructive Backspace Key: Check this box to erase characters as the Backspace key is pressed.
Ignore Programmed Macros: When checked, this box will cause the emulator to ignore any host or manually programmed T27 macro keys. Checking this box does not prevent Enable scripts related to action keys from running. The box is checked by default.
CR acts like TAB: Check this box to make the Carriage Return key (Enter) behave like the Tab key.
In this text box, enter the column positions (separated by commas) of the tab stops. The default is 1,9,17,25,33,41,49,57.
From this drop-down list box, select a country that most closely matches your keyboard requirements.
Edit Translation Tables: Click this button to open the BlueZone T27 Character Translation Configuration dialog. This dialog provides the ability to select and edit character translation sets for specific countries.
 SEE How
to Configure Character Translation
for more detailed information.
The mutually exclusively option in this group specifies what action occurs when the Clear key is pressed.
Clear Entire Screen: Select this option to clear the entire screen.
Clear Fields Only: Select this option to clear all unprotected fields.