 Connecting to the Host SystemConnecting to the Host System
The T27 Connection Configuration dialog is used to control the overall operation of the configuration process and to configure routes to a host visually. The dialog contains a work area where routes and virtual destinations (hosts) may be easily linked together with the use of a mouse.
Configuring a host connection requires the following steps:
Launching the T27 Connection Configuration Dialog
Editing the Default Route
Editing the Default Virtual Destination
Selecting a Connection Route
From the BlueZone MenuBar, choose Session:Configure. The Session Configuration dialog will appear.
Click the Configure button located to the right. The T27 Terminal Configuration Settings dialog will now be displayed.
Click the Configure Connections button.
 NOTE The
first time you access this dialog, you will receive the following message:
NOTE The
first time you access this dialog, you will receive the following message:
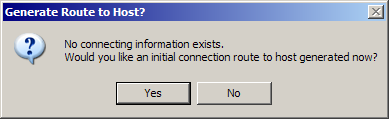
Click the Yes button to generate a route it now.
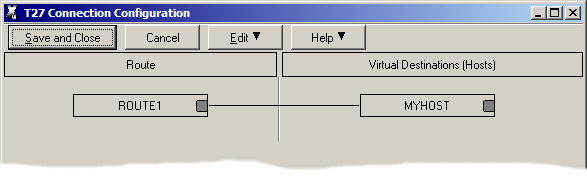
The T27 Connection Configuration dialog will now be displayed.
The work area is divided into two columns; one to configure Routes, and a second to configure Virtual Destinations.
The following is an example of the T27 Connection Configuration dialog with the default Route called ROUTE1, and the default Virtual Destination called MYHOST.
Click the Edit button and select Route Actions:Edit. Or, double click on the ROUTE1 button. The Edit Route dialog will be displayed.
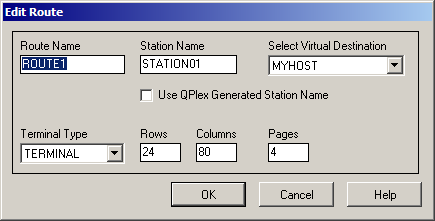
Edit the following information as needed:
Route Name: Route Name is used to link to a virtual destination on the BlueZone T27 Visual Configuration window. One route must be configured for each environment that is to be connected.
Station Name: In this text box, enter a station name. The station name may be any meaningful name.
Select Virtual Destination: From the drop-down list box, choose a configured virtual destination to which the route is to be linked.
Use QPlex Generated Station Name: Check this box if QPlex is being used as a gateway and QPlex will generate the station names.
Terminal Type: From this drop-down list box, choose the terminal type: TERMINAL or PRINTER.
Rows: In this box, enter the number of rows. The number of rows is limited to the range of 12 through 50. There will always be one more line for the status line. The default is 24.
Columns: In this box, enter the number of columns. Columns are limited to the range of 60 through 132 The default is 80.
Pages: In this text box, enter the number of pages in an environment. Pages may be in the range of 1 through 99. The default is 4.
OK: Click this button to accept changes made and close the window.
Cancel: Click this button to discard any changes made and close the window.
Click the OK button to exit the dialog.
Once you have the Route configured, the second step is to edit the default Virtual Destination. This is where you configure your Host information.
Click the Edit button and select Virtual Destination Actions:Edit. Or, double click the MYHOST button. The Edit Virtual Destination dialog will be displayed.
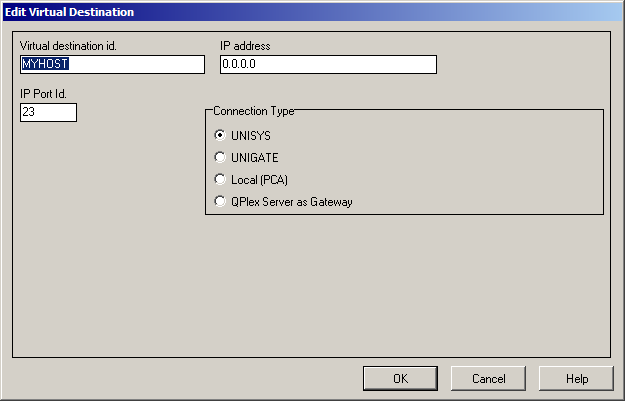
Edit the following information as needed:
Virtual Destination Id: This is the name of the Virtual Destination being configured. It will be used to link to a route on the BlueZone T27 Visual Configuration window.
IP Address: In this text box, enter an IP address (in "dotted" notation or symbolic destination machine name) of a host.
NOTE When
using a QPlex Server as a gateway, use the IP Address of the QPlex Server.
IP Port Id: This text box contains the port address to the host. This number is normally 23.
Connection Type: UNISYS (A-Series), UNIGATE (V-Series), Local (PCA) and QPlex Server as Gateway are currently the supported connection types.
OK: Click this button to accept changes made and close the window.
Cancel: Click this button to discard any changes made and close the window.
Click the OK button to exit the dialog.
Click the Save and Close button to exit the T27 Connection Configuration dialog.
Once the Route and Virtual Destinations have been configured, you must select a Connection Route.
Make sure that you are in the T27 Connection Configuration dialog and that the Connections Settings tab has been selected.
From the Connection Route drop-down listbox, select a Route that you edited or created in the above exercise as shown here:

Click the Save and Close button to exit the dialog.
Click the OK button to exit the Session Configuration dialog.
You should now be able to connect to your host system.
 SEE How
to Establish a Host Connection for more information.
SEE How
to Establish a Host Connection for more information.
How to Establish a Host Connection