The print queue consists of two types of files: print files and hold files. The SP-EDIT command is used to manipulate Spooler hold files. SP-EDIT can be used to:
Display and print all or part of any hold file.
Redirect a hold file to another printer or to a tape device.
Convert a hold file into data file items.
Delete one or more hold files from the Spooler.
Format
SP-EDIT [selection-options] [control-options] |
Parameter(s)
selection-options |
Can be any of the following: |
|
‘account’ |
Specifies all hold files created on a particular account. The account name must be enclosed within single or double quotes. |
|
Fn |
Specifies all hold files sent to a particular form queue. |
|
Fn-m |
Specifies all hold files sent to a range of form queues. |
|
n |
Number of the hold file. |
|
n-m |
Specifies a range of hold files. |
|
U |
Allows you to edit hold files generated from any account. You must have SYS2 privileges to use the U option. |
|
control-options |
Can be any of the following: |
|
H |
Suppresses the backup medium label. Use the H option in conjunction with the T option. |
|
L |
Displays the first 500 characters of the hold file. The L option will not work if the file is currently being printed; use the O option to display the beginning of a hold file while it is being printed. |
|
MD |
Deletes all selected hold files without prompting for each separate file (multiple spooling). Be careful when you use the MD option, since it deletes all specified hold files at once! |
|
MS |
Releases all selected hold files without prompting for each separate file (multiple spooling). |
|
N |
Suppresses automatic paging. |
|
O |
Displays the first 500 characters of a hold file that is currently being printed. |
|
P |
Sends the hold file to the printer, overriding the current SP-ASSIGN options. |
|
R |
Changes the form queue assignment and number of copies to those specified by the current SP-ASSIGN options. |
|
T |
Sends the hold file to the tape device or floppy disk drive. |
|
V |
Prevents the removal of trailing blank lines when converting a hold file to a data file. |
|
W |
Used with the T option; W causes SP-EDIT to wait until the tape drive or floppy disk drive is available. |
|
If SP-EDIT is invoked without any arguments, it selects all the hold files generated from your own account. A set of command-line options allow you to select hold files by number, by account, or by form queue.
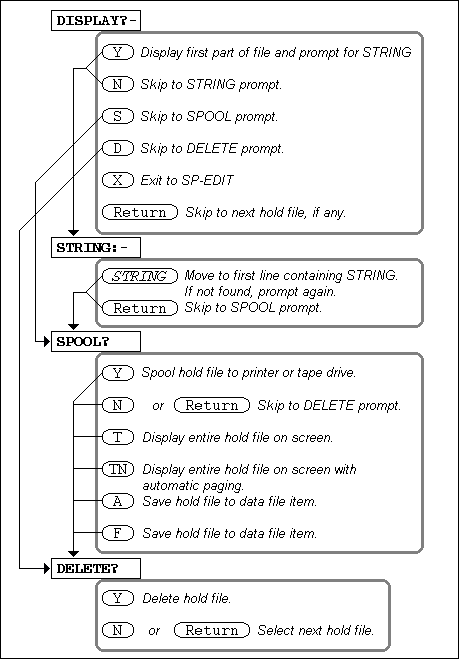
For each of the selected hold files, SP-EDIT prompts you for the appropriate action to take. There are actually four prompts that SP-EDIT uses to prompt for input. These prompts are summarized below in the order in which they are generally encountered:
DISPLAY |
Displays the first 500 characters of the hold file. |
STRING |
Specifies that printing of a hold file start at first line matching a string. |
SPOOL |
Spools the hold file for printing, display the file on your screen, or converts the file to a data file items. |
DELETE |
Deletes the hold file. |
The following illustration summarizes the responses at each prompt and how you can move from one prompt to the next. In addition, a group of command line options exist that avoid the prompting sequence and allow you to invoke SP-EDIT to perform a specific function.
Viewing the Contents of a Hold File
The first prompt that SP-EDIT offers is the DISPLAY prompt:
>SP-EDIT ENTRY # 8 DISPLAY (Y/N/S/D/X/(CR))? - |
8 is the entry number of the first hold file selected. To display the first part of the hold file, type Y at this prompt. You will see all lines up to the first 500 characters of the file, and the STRING prompt will be displayed. You can also use the L option on the command line to achieve the same result. You cannot view a hold file if it is currently being printed unless you enter the O option on the command line.
If you want to see a specific portion of the file, type N at the DISPLAY prompt to skip to the STRING prompt.
>SP-EDIT ENTRY # 8 DISPLAY (Y/N/S/D/X/(CR))? -N STRING:- |
Enter a character string to select the first line in the file that matches that string. If found, you will see the SPOOL prompt and can type T to view the file from the matched line to the end of file.
If you want to display the entire hold file, type S at the DISPLAY prompt to skip to the SPOOL prompt. At this prompt, type T to view the entire file. (Type TN to view it without automatic paging.)
If you select T at the SPOOL prompt to display the entire contents of the file on your screen, the first page is displayed. You can enter any of the following:
U |
Repeats the current page. |
T |
Causes output to start from the top. |
X |
Exits the displayed page and returns you to the SPOOL prompt. Any other character displays the next page. |
These three options are not available if the TN option is used.
Spooling a Hold File
You can spool the selected hold file from the SPOOL prompt.
>SP-EDIT ENTRY # 8 DISPLAY (Y/N/S/D/X/(CR))? -S SPOOL (Y/N=CR/T/TN/A/F)?- |
Type Y at the SPOOL prompt to send the file to the printer.
When you spool a hold file, the job normally uses the form queue assignment that was in effect when the job was submitted. You can use the LISTPEQS command to examine the assignment settings for jobs in the queue. If you want to change the form queue, you must establish a new form queue assignment with SP-ASSIGN and then invoke SP-EDIT with the R option.
If you attempt to spool a file and the following message displays:
YOUR OUTPUT SPECIFICATION IS NO OUTPUT. REASSIGN YOUR PROCESS IF YOU WISH TO OUTPUT A HOLD FILE. |
In this case, you need to change the printer assignment for your account before you are able to spool a file.
Deleting Hold Files
You must explicitly delete hold files from the print queue. Hold files remain in the queue after you examine them or spool them. You can delete a hold file at the DELETE prompt.
>SP-EDIT ENTRY # 9 DISPLAY (Y/N/S/D/X/(CR))? -D DELETE (Y/N=CR)? |
Type Y to delete the currently selected hold file.
You can also delete all selected hold files by using the MD option on the command line. You are not prompted to confirm deletion. For instance, if you want to delete all hold files generated in your account, type the following command:
>SP-EDIT MD ENTRY #8 ENTRY #9 END OF PRINT FILE CONTROL BLOCK. |
Two entries were deleted.
Converting a Hold File to a Data File Item
During a filesave, no hold files are written to tape drive or floppy disk drive. To retain a hold file, you must convert it into a data file item. Responding F to the SPOOL prompt creates data file items.
The following prompt appears:
FILE NAME?- |
Enter the name of an existing data file to which you want to transfer the hold file. Next, this prompt appears:
INITIAL ITEM NAME?- |
Enter the name of the item. If the item already exists, it will be overwritten. The hold file is then converted into an item in the file you specified. The item is output in RUNOFF format. To print, type:
RUNOFF file item-ID (P) |
Selecting Hold Files
This section shows some of the ways to select the hold files you want to edit. Normally, SP-EDIT selects the hold files associated with the account. You can specify that you want to select all hold files system-wide, hold files associated with another account, or hold files in your account assigned to only a particular form queue.
The U option selects all available hold files, whether generated by the account you are logged on to or not:
>SP-EDIT U ENTRY #1 DISPLAY (Y/N/S/D/X/(CR))? |
You are prompted for each selected hold file unless you exit by typing X at the display prompt.
You can specify hold files generated in another account by specifying the name of the account in quotes. The following example selects all hold files generated from the SALES account:
>SP-EDIT 'SALES' |
The Fn option restricts selection to a form queue n, or to a range of form queues, n-m. The following example selects all hold files generated on the account you are logged on to which were sent to form queue 1:
>SP-EDIT F1 |
These options can be combined. For instance, UF1 selects all hold files system-wide that were sent to form queue 1.
Spooling and Deleting Multiple Hold Files
The MS and MD options are used to avoid being prompted individually for each of the selected hold files. The MS option spools all selected print files to the form queue originally specified. The MD option deletes all selected print files.
The following example sends all hold files created by the SALES account to form queue 4:
>SP-EDIT F4MS 'SALES' |
The next example deletes all hold files created on any account that were sent to form queues 1 or 2:
>SP-EDIT UF1-2MD |
Redirecting Hold Files
You can redirect one file or multiple files. The following example changes the form queue assignment and number of copies to those specified by the current SP-ASSIGN options. First type this command:
>SP-ASSIGN F2 |
This assigns the output form queue to form queue 2. Then type this command:
>SP-EDIT F6RMS |
This redirects the files that were generated on this account for form queue 2 to form queue 6 without prompting for separate user input.
See Also
Reinitializing the Print Spooler
Assigning Print Spooler Specifications
Assigning a Printer to a Form Queue with the ASSIGNFQ Command
Using the Print Spooler with Backup Media