Launch or switch to the Administration Utility, which may be accessed via the Windows Task bar.
Select the Server tab if it is not displayed.
Select Authorization. The mvBase Authorization dialog box displays. The Authorization Code field displays the current status of unauthorized, and a unique System ID.
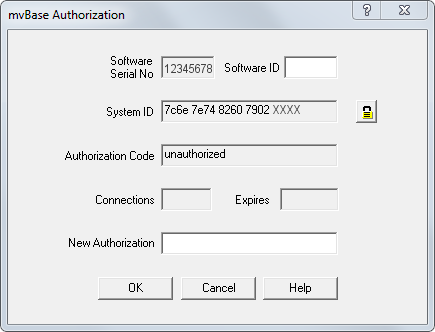
Enter the authorization code in the New Authorization field. The means to obtain the authorization code depends on whether this is a first-time installation, an upgrade from an earlier release, or an increase in the number of authorized connections.
For first-time installation of mvBase, you may use a temporary authorization code. This is located on the CD-ROM jewel case insert or on one or more of the floppy diskettes.
When installing mvBase with a temporary authorization code, the authorization expires in 14 days. Obtain a permanent code from a representative of Rocket. When you procure a new permanent authorization code, Rocket’s Order Administration requires the System ID listed in the mvBase Authorization dialog box, which you access via the Authorization button as in step 3 above.
When an increase in the number of authorized connections is required, obtain a new permanent authorization code from a representative of Rocket by purchasing additional licenses.
Click OK. A confirmation message box displays with the maximum quantity of simultaneous connections and expiry date (if applicable).
Click OK. The Server tab displays for additional configuration or startup, or you may close the Administration Utility.