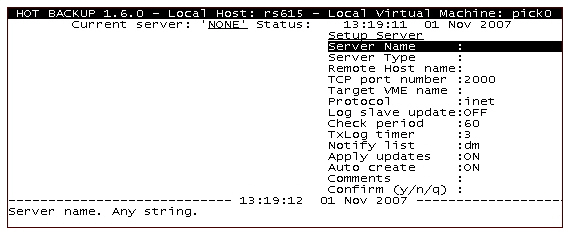
| Server Name |
Name for the slave server. Can be any alphabetical string
up to eight characters. |
| Server Type |
Specifies whether the server is to be the Master or the Slave
server.
Type S for slave.
|
| Remote Host name |
For master servers only. |
| TCP port number |
TCP port number, from 1024 to 32767, of the associated slave
server. The default is 2000. Note: This should be the same port number
defined on the master server.
|
| Target VME name |
For master servers only. |
| Protocol |
inet. Cannot be modified. |
| Log slave update |
This option is for Hot Backup implementations that employ
multiple cascading servers. If set to ON, all updates
received by the slave are logged in the transaction log queue, to
be sent to another system. If set to OFF (default),
the updates are not enqueued. |
| Check period |
For master servers only. |
| TxLog timer |
For master servers only. |
| Notify list |
List of D3 users (as defined in the D3 users file) or D3 port
numbers to notify in case of error, separated by commas. The port
numbers are expressed in a syntax similar to the TCL command msg. For example, to notify the users dm and bob, and line
0 (regardless of whether it is logged on): dm,bob,!0
|
| Apply updates |
Instructs the slave server to apply the updates it receives
from the master server immediately (ON) or delay
them (OFF) until it receives an explicit command.
Normally, this option should be set to ON. Note: When the slave server starts, it reports the status of this option.
Applying updates should not be disabled long, since the slave and
master databases can be become out-of-sync when updates are not applied.
|
| Auto create |
Automatically creates any missing accounts and files on
the slave server.
Note: It is a good precaution to leave this option
set to ON.
|
| Comments |
Any comments. |