 CAUTION!
We do not
recommend upgrading sites that are in production, but copy the production
site to a new location then, performing the upgrade. Users
can be pointed to the new site once it has been tested.
CAUTION!
We do not
recommend upgrading sites that are in production, but copy the production
site to a new location then, performing the upgrade. Users
can be pointed to the new site once it has been tested.|
Installation |
BlueZone Web-to-Host |
Web-to-Host Wizard versions previous to version 4.0, created a single directory, or "Site", under which, several launch pages (or folders) were created. All of this information was maintained in the Wizard's configuration file. Web-to-Host Wizard versions 4.1 through 5.0, can create multiple Web-to-Host Sites and do not maintain any internal configuration information, but instead, read files from the existing Launch Folders (and associated Launch Pages) to populate the Wizard's configuration panels. This allows the Web-to-Host Administrator to make changes and re-publish these pages without the risk of the Web-to-Host Wizard becoming out of sync with the published pages.
There are three significant differences between the BlueZone Web to Host Wizard versions 4.1 through 5.0 and previous versions:
The previous versions allowed the configuration of a limited number of connection parameters, while requiring that the BlueZone emulation clients be configured and saved separately for other parameters. Web-to-Host Wizard versions 4.1 through 5.0, integrate the launching of "live" BlueZone emulation client sessions into the process, allowing the BlueZone emulation client configuration to be created and saved automatically.
Web-to-Host Wizard versions 4.1 through 5.0, have a built in Web Server allowing the Web-to-Host web pages to be created and tested immediately, without having to run IIS or copy the files to another server to be tested.
In addition to English, BlueZone emulation clients and Web-to-Host Wizard versions 4.1 through 5.0, support French, German, Dutch and Japanese. The language is selectable on a Site-by-Site basis so it is possible to create Sites for specific languages.
Web-to-Host Wizard versions 4.1 through 5.0, offer two options with regard to existing BlueZone Web-to-Host sites:
Importing an Existing Site without Upgrading BlueZone - Import an existing Web-to-Host site without upgrading the version of the BlueZone emulation clients. This allows older Web-to-Host sites to be administered using the Web-to-Host Wizard 5.0, without affecting the version of the BlueZone emulation clients users are currently running.
Upgrading an Existing Site While Upgrading the BlueZone Emulator - Upgrade an existing Web-to-Host site while upgrading the version of the BlueZone emulation clients at the same time.
 CAUTION!
We do not
recommend upgrading sites that are in production, but copy the production
site to a new location then, performing the upgrade. Users
can be pointed to the new site once it has been tested.
 NOTE For
pre-version 3.3 Customers, please read Manually
Upgrading a Pre-3.3 Version of BlueZone Web-to-Host before proceeding.
One of the most powerful features of the Web-to-Host Wizard Version 5.0, is its ability to "Import" existing Launch Pages made by earlier BlueZone Web-to-Host Wizards.
 NOTE This
procedure assumes that the existing Web-to-Host sites that you wish to
import are located on a Microsoft platform and that the new Web-to-Host
Wizard 5.0 is being installed on the same server.
Install the BlueZone Web to Host Wizard 5.0. When the installation is complete, a shortcut to launch the Web-to-Host Wizard will be placed on the desktop. I need some help with this!
Using the desktop shortcut, launch the newly installed Web-to-Host Wizard. The Sites page will be displayed. The Sites list will be empty as shown here:.
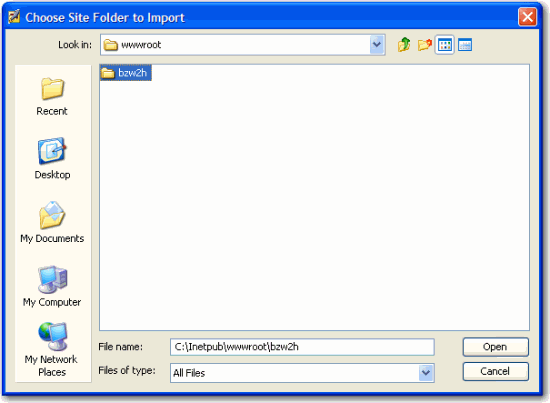
On the Sites page, click the Import button. A standard Windows file dialog will be displayed.
Browse to your existing BlueZone Web-to-Host installation. If you are upgrading a pre-4.0 version of Web-to-Host, the default name of this folder is usually "bzw2h" and is usually located in \inetpub\wwwroot\ on the web server.

Once you have selected the desired site folder, click the Open button. You will be asked to confirm the import.
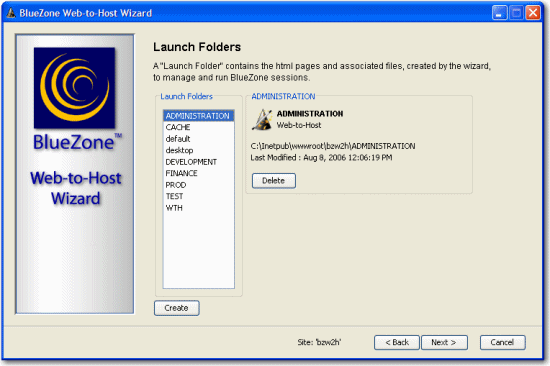
Click the OK button. Once the site is finished importing, the Web-to-Host Wizard will automatically advance to the Launch Folders page. The importation process is complete and the Site is now ready to be administered with the Web-to-Host Wizard.

On the Launch Folders page, all the Launch Pages from the imported site appear as Launch Folders.
 NOTE The
Web-to-Host Wizard will also import two folders called "default"
and "desktop" from your previous installation. These
Launch Folders are no longer needed
and can be deleted.
Select a Launch Folder and click the Next button. All the Sessions for the selected Launch Folder will be displayed.
On the Sessions page, you may see an Overrides button to the right of the Delete button. This button provides backward compatibility with previous versions of the Web-to-Hot Wizard. New Sessions created with the Web-to-Host Wizard 4.X will NOT display the Overrides button because all of the connection information is contained in the BlueZone emulation client configuration file and not extracted from the Object Tag.
The following is an example of the Overrides dialog:
There is no need to change any values in the Overrides dialog. You can continue to use the Overrides feature just as you did in the previous versions of the Web-to-Host Wizard.
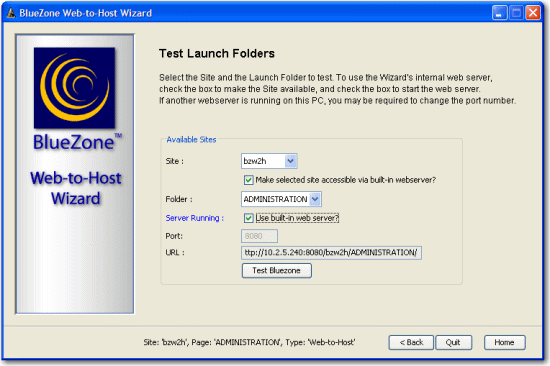
Click the Next button two times to advance to the Test Launch Folders page where you can select and test each Launch Folder.

If you are running the Web-to-Host Wizard on a Microsoft platform with IIS enabled, you can use the IIS web server or you can use the built-in web server to do your testing.
 NOTE If
you attempt to enable the built-in web server and you receive the following
message:
It's because there is a web server already running on port 80. The remedy is to pick another port (like 8080) and try again.
To test the Launch Folder, click the Test BlueZone button.
To test additional Launch Folders, choose the desired folder form the folder listbox and click the Test BlueZone button. You can test all your Launch Folders from this page without having to go back and select each Launch Folder from the Launch Folders page.
 NOTE To
import multiple Web-to-Host sites, simply repeat the import process for
each site. If
any of your existing Web-to-Host sites have duplicate names, you must
rename them with unique names before importing them into the new Web-to-Host
Wizard.
Congratulations! You have successfully imported your existing Web-to-Host sites into the new BlueZone Web-to-Host Wizard.
For more information regarding the features of the BlueZone Web to Host Wizard please consult the Web-to-Host Wizard - How To Guide.
As an option, you can also choose to perform a complete "upgrade" of your current Web-to-Host installation. We do not recommend directly upgrading a BlueZone Web-to-Host site that is in production. It is preferable to copy the production files to a new folder for testing, then, after upgrading and testing are complete, changing the virtual directory on the web server to the new folder.
 NOTE This
procedure assumes that the existing Web-to-Host sites that you wish to
upgrade are located on a Microsoft platform and that the new Web-to-Host
Wizard 5.0 is being installed on the same server.
Install the BlueZone Web to Host Wizard version 5.0. When the installation is complete, a shortcut to launch the Web-to-Host Wizard will be placed on the desktop. I need some help with this!
On the web server, navigate to the location of your existing BlueZone Web-to-Host installation. The default name of this folder is usually "bzw2h" and is usually located in \inetpub\wwwroot\ on the web server.
Using Windows Explorer, make a copy the existing site to be upgraded. In this exercise I copied "bzw2h" to "bzw2hcopy".
Using the desktop shortcut, launch the new Web-to-Host Wizard. The Sites page will be displayed. The Sites list will be empty.
On the Sites page, click the Create button. A standard Windows file dialog will be displayed. Browse to the location of the copied site, select it and click the Open button. You will be prompted to create the site.
Click the OK button. The Site will be created and added to your Sites list as shown here:
Click the Next button to go to the Launch Folders page as shown here:
On the Launch Folders page, you will see that all the Launch Pages from the copied site appear as Launch Folders.
 NOTE The
Web-to-Host Wizard 5.0 will also copy two folders called "default"
and "desktop" from your previous installation. These
Launch Folders are no longer needed
and can be deleted.
Select a Launch Folder and click the Next button. All the Sessions for the selected Launch Folder will be displayed as shown here:
On the Sessions page, note the presence of the Overrides button. This button provides backward compatibility with previous versions of the Web-to-Host Wizard. New Sessions created with the Web-to-Host Wizard will NOT display the Overrides button because all of the connection information is contained in the BlueZone emulation client configuration file and not extracted from the Object Tag.
The following is an example of the Overrides dialog:
There is no need to change any values in the Overrides dialog. You can continue to use the Overrides feature just as you did in the previous versions of the Web-to-Host Wizard.
Click the Next button two times to advance to the Test Launch Folders page where you can select and test each Launch Folder.
If you are running the Web-to-Host Wizard on a Microsoft platform with IIS enabled, you can use the IIS web server or you can use the built-in web server to do your testing.
 NOTE If
you attempt to enable the built-in web server and you receive the following
message:
It's because there is a web server (probably your IIS web server) already running on port 80. The remedy is to pick another port (like 8080) and try again.
To test the Launch Folder, click the Test BlueZone button.
To test additional Launch Folders, choose the desired folder form the folder listbox and click the Test BlueZone button. You can test all your Launch Folders from this page without having to go back and select each Launch Folder from the Launch Folders page.
 NOTE To
upgrade multiple Web-to-Host sites, simply repeat the upgrade (Create)
process for each site. If
any of your existing Web-to-Host sites have duplicate names, you must
rename them with unique names before importing them into the new Web-to-Host
Wizard.
Congratulations! You have successfully upgraded your existing Web-to-Host sites to use the new BlueZone Web-to-Host Wizard.
For more information regarding the features of the BlueZone Web to Host Wizard please consult the Web-to-Host Wizard - How To Guide.
Related Topics: