How To Guide - Advanced

BlueZone Web-to-Host

How to Add Session Manager Icon to the Windows TaskBar Tray

Session Manager Tray Icon: Click here to learn more about this feature

By default, when BlueZone Served Desktop is deployed to your End Users, the BlueZone Session Manager Icon will not be automatically be added to the Windows TaskBar Tray.  Enabling this feature gives your End Users the ability to launch the Session Manager from the Windows TaskBar Tray and also, the ability to right click the Session Manager tray Icon to launch sessions from the pop-up menu as shown here:

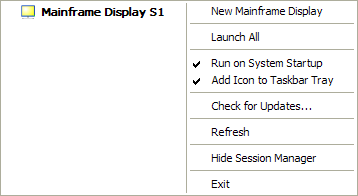
Note that Users can also check for updates from the pop-up menu.

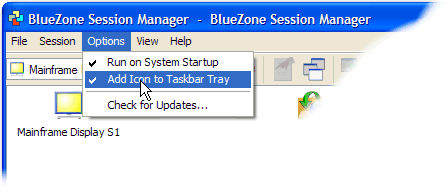
If your End Users do not want the BlueZone Session Manager to run from the Windows Taskbar Tray, they can turn off this feature by de-selecting Options:Add Icon to Taskbar Tray.  This will turn off this feature.

Configuration Method: Manual Configuration

Feature Scope: Site Level Feature


NOTE  This feature applies to the Served Desktop Mode only.

Procedure

  1. On the web server, navigate to the desired Site that you wish to change.

For example:

C:\Inetpub\wwwroot\MySite


  1. Locate and display the contents of the \template folder.

  2. Locate the desktopt.ini file and edit it with Notepad.

  3. Locate the RunInTray=No entry in the [Session Manager] section.

  4. Change the No value to Yes and save the file.

Any new Launch Folders that are created from this point on, will have the Run In Tray Feature enabled for all Sessions.

NOTE  If you have already created one or more Launch Folders, you will have to go to each existing Launch Folder, and edit the desktop.ini file, changing the RunInTray=No to Yes.

TIP  It is possible to enable or disable the Run In Tray Feature individually for each existing Launch Folder.  This is accomplished by editing the desktop.ini file located in only the Launch Folders you wish to change.


Related Topics:

How to Create Desktop Shortcut Icons that Launch Specific Configuration Files