
|
Administering BlueZone |
Chapter 6 |
Using Setup to Create a Distribution Image Directory - All Modes
Create an Automatically Loading Configuration File - Profile Mode
Create an Automatically Loading Configuration File - Registry Mode
The BlueZone installation and configuration process may be completely customized to meet the needs of end users without creating an unnecessary administrative burden. Using the information provided in this chapter, you can select only the BlueZone program files necessary for distribution. The SETUP.INI file can be modified, and a pre-configuration file created. This collection of files is called a BlueZone Distribution Image.
The BlueZone Setup program has a System Administrator option to “Create a Distribution Image” on the first panel of the setup program. Using this option allows the setup program to copy the selected compressed installation files creating a customized setup directory that installs with minimal user input. Further automation of the setup process can be accomplished through the use of the Quiet Mode Installation feature.
Launch the BlueZone Setup Program just as if you were going to install BlueZone from the BlueZone CD or by double clicking on the SETP.EXE program in the BlueZone Desktop folder of the BlueZone image.
Illustration 6-16
Select the “Create a Distribution Image (for System Administrators)” radio button. Click the Next button.
You will be presented with the BlueZone License screen as shown:
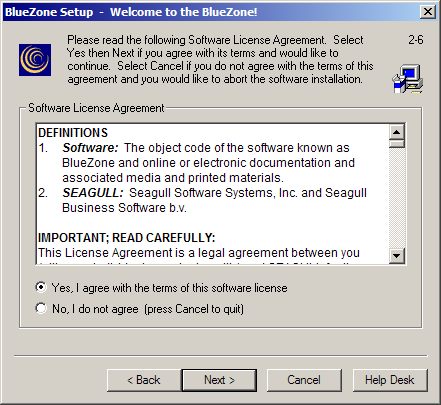
Illustration 6-17
Respond to the BlueZone Software License Agreement question and click the Next button.
Create a separate directory where the BlueZone Distribution Image files can be stored. They can be stored anywhere on your hard drive. They do not necessarily have to be stored with the other BlueZone files. In the following example, they will be stored in a sub-directory of BlueZone called “Image”.
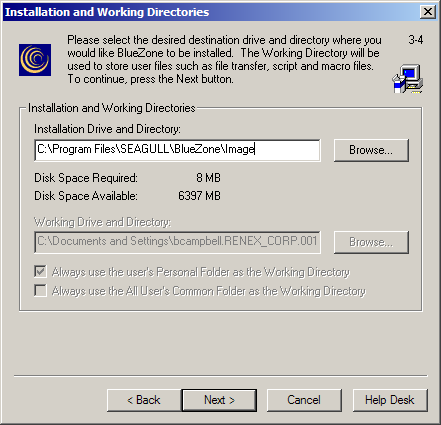
Illustration 6-18
Click the Next button.
You will now be presented with the BlueZone Components screen as shown:

Illustration 6-19
Un-check the BlueZone components that you do not need. Use the scroll bar in the dialog to view all the BlueZone files. Only the checked items will become part of the Distribution Image. Click the Next button.
BlueZone will copy only the checked files to the directory that you specified in illustration 6-18 above. When all the files are copied, you will receive the following message.
Illustration 6-20
Copy any BlueZone Profiles (configuration files) that you may have created into the Distribution Image directory. During installation, if BlueZone Setup encounters any BlueZone Profiles (configuration files), it will automatically copy them to the End Users "config" folder.
The final step is to copy your Software Activation File (SEAGULL.SAF) into the Distribution Image directory.
Congratulations! You now have a distribution image that you can use to distribute a fully configured version BlueZone to your End Users for installation on their workstations. The Distribution Image contains the SETUP.EXE program just like the BlueZone Desktop folder on the BlueZone CD. All the End User has to do is double click the SETUP.EXE program to install BlueZone.
 TIP
You can
use the BlueZone Distribution Image to create a self-extracting installation
file by using a combination of WinZip and WinZip Self Extractor. To
do this, change the Quiet Mode Installation setting in the SETUP.INI
file to “Yes”.
TIP
You can
use the BlueZone Distribution Image to create a self-extracting installation
file by using a combination of WinZip and WinZip Self Extractor. To
do this, change the Quiet Mode Installation setting in the SETUP.INI
file to “Yes”.
If you want to deliver BlueZone to your End Users with one or more pre-configured BlueZone Profiles, all you have to do is create the desired number of BlueZone Profiles (configuration files), and copy them to the BlueZone Distribution Image.
When your End Users perform the BlueZone installation, BlueZone will automatically copy any Profiles into the End User’s “config” folder.
If you are using BlueZone Session Manager, the BlueZone Profiles you created will automatically appear in the Session Manager the first time it is launched.
If you are not using Session Manager, and the End User is launching BlueZone from Program Files or from a desktop icon, the profiles will automatically appear in the Select or Create New Profile dialog box that displays when a BlueZone client is launched.
TIP
This feature
also works for BlueZone script files as well. Just
add your script files to the distribution image.
A START, Sx or SxLOCK file is automatically loaded the first time BlueZone is launched or if no valid configuration information is found in the Registry. This feature allows a System Administrator to configure one copy of BlueZone, save the configuration to a file, and load it on any system automatically by including the START, Sx , or SxLock file on the distribution diskette. An exact duplicate of the original configuration will be loaded the first time the new copy of BlueZone is launched. Use the File:Save As command to create the configuration file.
The following Table shows START files and their associated BlueZone Emulation Client.
|
File Name |
BlueZone Emulation Client |
|
START.ZMD |
BlueZone Mainframe Display |
|
START.ZMP |
BlueZone Mainframe Printer |
|
START.ZAD |
BlueZone iSeries Display |
|
START.ZAP |
BlueZone iSeries Priner |
|
START.ZVT |
BlueZone VT Display |
|
START.ZFT |
BlueZone FTP Client |
|
START.ZTP |
BlueZone TCP/IP Print Server |
 CAUTION!
START
files must be in the same directory as the BlueZone program being executed
to function properly. DO
NOT place them into the Configs
directory.
CAUTION!
START
files must be in the same directory as the BlueZone program being executed
to function properly. DO
NOT place them into the Configs
directory.
 NOTE
SxLOCK
files load automatically from the file every time the corresponding BlueZone
session is launched. Its
primary purpose it to allow the reconfiguration of sessions locked using
the Global Lock function.
NOTE
SxLOCK
files load automatically from the file every time the corresponding BlueZone
session is launched. Its
primary purpose it to allow the reconfiguration of sessions locked using
the Global Lock function.
 SEE
Saving
& Opening Configurations in Chapter
5 Configuring BlueZone for additional information.
SEE
Saving
& Opening Configurations in Chapter
5 Configuring BlueZone for additional information.
Customizing the SETUP.INI file further automates the distribution process by creating a Quiet Mode installation, eliminating the need for any user intervention during the installation process. The Quiet Mode installation installs BlueZone without any setup screens being displayed. The complete setup and configuration only takes a few seconds.
SEE
Appendix
A BlueZone SETUP.INI for format details and examples.
The SETUP.INI file is divided into nine sections; BZSetup, HLLAPI, Program Group, Desktop Shortcuts, WinJa, JWalk, Support, About, and Activation.
The BZSetup section contains the entries that control the Quiet Mode installation including the source directory, destination directory, preferred connection type, network installation and where the End Users files will be installed.
The HLLAPI section is used to for specify a value which is used by BlueZone scripting.
The Program Group sets whether a program group will be created, the name of the group, and the names associated with each icon.
The Desktop Shortcuts section sets whether desktop shortcuts will be created, and the names associated with each shortcut.
The WinJa and JWalk sections are for integrating the BlueZone emulator into those products.
The Support section provides the customizable text for the Help:Technical Support dialog. This is useful for directing end users to the correct Help Desk information.
The About section contains the text for Help:About dialog.
The Activation section is for future use.
CAUTION!
SETUP.INI
must be in the same directory with SETUP.EXE
to function properly!
Distributing BlueZone to End Users