Uniface IDE
The Uniface IDE is an integrated collection of tools for building and integrating the components and libraries required for Uniface web, desktop, and mobile applications. Application definitions that are created with the Uniface IDE are stored in the Repository, an SQL-enabled database.
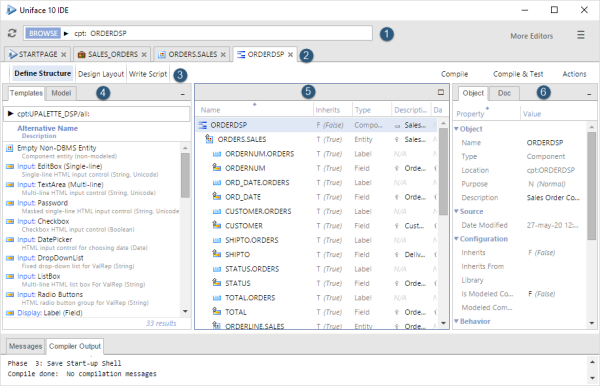
- Header—use the facilities at the top of the window to find and navigate to your development objects, and import definitions from XML files.
- Editors—each main development object is opened in its own editor tab. You can have multiple objects open at one time and easily switch between them. Panes in the editor can be resized.
- Worksheets—collection of tools tailored to completing a specific editing activity. Each worksheet contains a Resource Browser on the left, a Properties Inspector (or Compiled Module Inspector) on the right, and a worksheet editor in the middle.
- Resource Browser—templates, objects, and code snippets that you can insert into the current object.
- Worksheet editor—the main editor of the worksheet, such as the Structure Editor, Script Editor, or Layout Editor, and so on.
- Properties Inspector—properties of the development object selected in the worksheet editor.
- Output tabs—use the tabs at the bottom of the window to view messages and compiler output.
To provide extra work area, especially if you are working with large monitors or dual monitors, you can open a second window, known as the Alternative Window.
Development Repository
Definitions of development objects created and modified using the Uniface IDE are stored in the Repository. By default, Uniface uses SQLite as the default database on Microsoft Windows, but you can configure any supported SQL-capable DBMS as the repository. For more information, see Configuring the Database Connector.
Using the Uniface IDE
The Uniface IDE is designed for Uniface's model-driven approach to application development. The basic steps for creating an application are:
-
Create a project. From the Menu in the top-right corner, choose Create Project.
-
Drag templates for Modeled Entities and Components from the Resource Browser into your Project. This creates new objects based on the templates.
-
Open the modeled entities and define their fields, keys and relationships.
-
Open the components and define their characteristics:
-
Data Structure: drag modeled entities and fields into the component structure to define the data that the component accesses.
-
Script: write procedural logic in Uniface's ProcScript or in JavaScript. Use the Resource Browser to insert snippets of code containing language constructs or complete modules.
-
Layout: define the user interface using HTML and CSS. Use the Resource Browser to insert HTML constructs or to bind data elements to layout elements.
-
-
Compile and test your components