Configuring On-Premises Served Network Licenses
You are given an Entitlement ID when you register with Uniface, which allows you to access the Sentinel EMS customer portal, where you can lock your license to a specific machine and obtain the actual license file.
While connected to the EMS portal, you need to obtain a locking code, which is the unique machine identification that locks the license file to your machine. To obtain your locking code, you run one of the following utilities provided in the \common\bin directory of your Uniface installation:
- Wechoid (Windows only). This can also be downloaded from the activation screen on the EMS.
- echoid
Wechoid and echoid are also provided in the RMS License Manager installation package.
To configure your on-premises served network license:
- Log in to the EMS portal with your Entitlement ID and click Activate.
-
Obtain a locking code. If you are using Wechoid on Windows:
- Open the Wechoid utility.
Note: You must run this on the machine you want to use the license.
- Tick the criteria in the Wechoid dialog that match the locking criteria listed on the Sentinel EMS customer portal's activation screen. For example, this might say Disk ID + UUID.
Remove the check marks for any criteria that are not applicable. Generating the wrong Locking Data renders your license invalid.
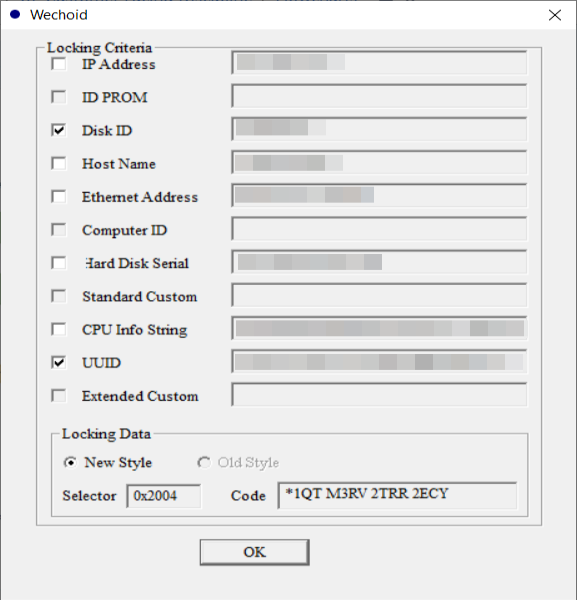
- Copy the generated Locking Data from the Code field, including the
*into the Client info field on the Sentinel EMS customer portal.
If you are using echoid:
- Open echoid.dat from the \common\bin directory.
- At the end of the list, enter the selection that matches the locking criteria listed on the portal's activation screen, for example 0x3D9F, which indicates all criteria are selected. In the case of multiple locking criteria, calculate the locking data by adding the hexadecimal values of the different criteria. In most cases, you will use 0x004, which locks a license to the disk ID.
- Run echoid.exe from the command line. This reads the locking data from echoid.dat and generates a locking code.
C:\Program Files\Uniface\common\bin>echoid.exe

Sentinel RMS Development Kit 9.8.0.0048 Host Locking Code Information Utility
Copyright (C) 2021 Thales Group
All Rights Reserved.

Locking Code 1     :   4-*1AB CDEF HIJ KLMN
- Copy the generated locking code from
*to the end.
- Open the Wechoid utility.
- Paste the client info from Wechoid or the locking code from echoid into the activation screen on the portal and click Activate. This creates a license file that you can download.
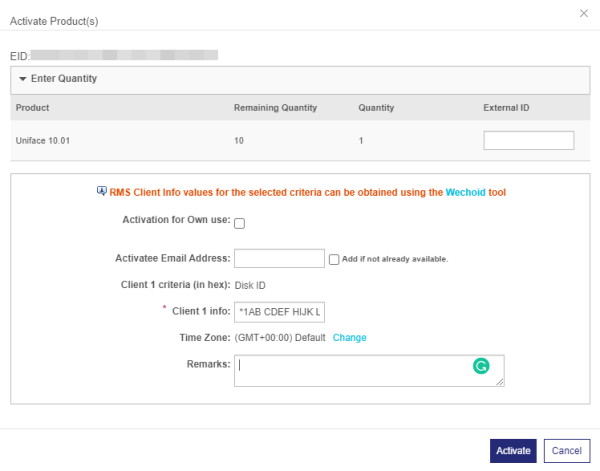
- Download the license file and make a note of the saved location.
- If you have not already done so, download the RMS installation scripts for Windows or Unix from the Uniface Downloads site.
Note: Cloud-served licenses are only supported on some Linux platforms (RedHat, SUSE, and Debian).
- Follow the installation steps for your platform. For more information, see Installing the Sentinel RMS License Manager on Windows or Installing the Sentinel RMS License Manager on Unix and Linux.
- When prompted during installation, enter the path of your license file.
- In your application's assignment files, set $LICENSE_OPTIONS to include the hostname for your RMS. For example:
$LICENSE_OPTIONS=LM_LICENSE_FILE=your.rms.hostname.tld
