Managing connections
The UTS Host Connections dialog can be used to visually manage multiple host connections.
This dialog is used to control the overall operation of the
configuration process and to configure routes to a host visually.
The dialog contains a work area where open IDs and virtual destinations
(hosts) can be easily linked together with the use of a mouse.
The
work area is divided into two groups: one to configure open IDs and
one to configure virtual destinations. 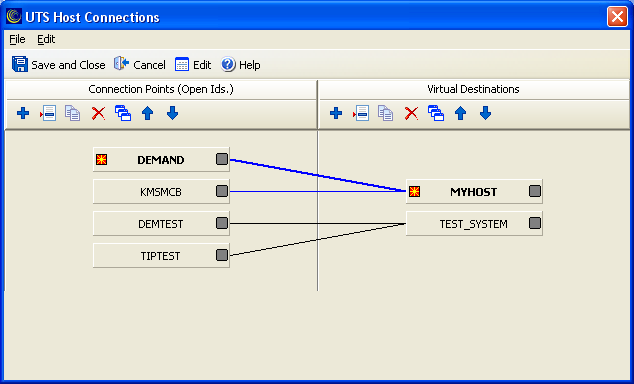
The UTS Host Connections dialog contains the
following menu options:
- File
Save and Close
Print
Cancel and Close
- Edit
- Edit Message Strings: Allows you to configure the messages sent if an specific action is taken. Opens the Edit eXpress Connect Message Strings dialog. In this dialog, you can configure the strings for the following information:
Open String
Close String
Session opened string
Session closed string
Enter session string
Invalid destination string
Output interrupt string
Open in progress string
Sort ALL Lists: Sorts the configured connection points and virtual destinations in alphabetical order.
The Connection Points and Virtual Destinations work areas each have a set of the following buttons:
| Icon | Name | Description |
|---|---|---|
 |
Add new Destination | Click to add a new virtual destination. |
 |
Edit selected Destination | Click to edit the selected virtual destination. |
 |
Duplicate selected Destination | Click to duplicate the selected virtual destination. |
 |
Delete selected Destination | Click to delete the selected virtual destination. |
 |
Sort Destinations | Click to sort all configured virtual destinations in alphabetical order. |
 |
Move selected Destination Up | Click to move the selected virtual destination up one position. |
 |
Move selected Destination Down | Click to move the selected virtual destination down one position. |
You can perform the following mouse actions in the UTS
Host Connections dialog:
- Select an existing open ID or virtual destination
- Click an open ID or virtual destination. The selected open ID
or virtual destination name becomes bold and an orange box displays
on the left side of the open ID or virtual destination button. If
you select an open ID, the linked virtual destination is also highlighted. Note: The functions of left and right mouse button may be swapped by selecting the Mouse icon from the Windows Control Panel.
- Edit an existing open ID or virtual destination
- Double-click an open ID or virtual destination to open the appropriate configuration dialog and edit the required parameters.
- Link an open ID to a virtual destination
- Click the dark gray square on the right of the open ID button, while continuing to hold down the mouse button, drag the cursor to the orange square on the desired virtual destination and then release. A blue line displays between the open ID and virtual destination.