Using the Condition Editor
HostFront Legacy Integrator has a conditions editor that makes defining complex conditions an easy task.
To display the condition editor follow the steps below.
| 1. | Connect to the HostFront and navigate to a screen. Ensure that the screen selected in the navigation tree matches the screen displayed in the emulation window. |
| 2. | In the PropertyGrid, click on the ellipsis next to the property Definition. The Condition Editor dialog box appears.
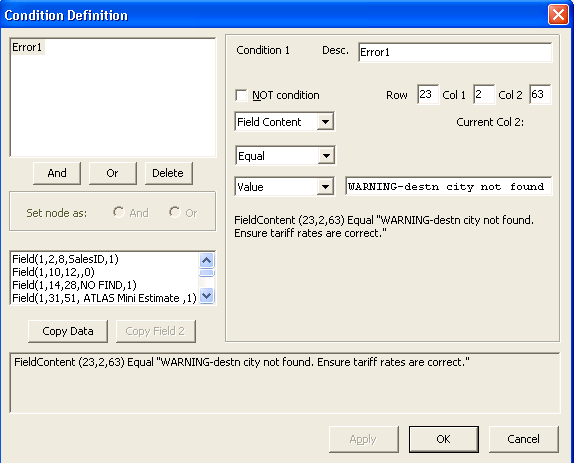 The Conditions Definition dialog box shows a tree representation of the condition where the nodes are logical operators and
the leaves are simple conditional expressions. Below is a description of the different parameters in the Conditions Definition
dialog box.
AND button
By clicking this button, the selected node in the logical tree is replaced by a sub-tree with two children. The first child
is the old sub-tree that has the selected node as a root and the second is a TRUE expression that can be modified to represent
your new simple conditional expression.
OR button
Same as AND button except that the root of the new sub tree is an OR and the new leaf added is a FALSE expression.
Set Node As options
Allows you to quickly change an "AND" condition to "OR" or vice versa. Although the node change immediately, you need to press
the Apply button to update the condition definition at the bottom of the dialog box.
|
| 3. | To define the new simple condition, select the new child (TRUE or FALSE) in the tree and then, in the right pane, provide
information for the following parameters: Desc
Choose a Description for your simple expression.
Not Condition
Determines if it is to be negated.
Test Definition
Determine the type of the test (content, attribute, existence).
Test Definition
Select one of the comparison values (Equal, Not Equal, Has, Greater or Equal, Less Than, Less or Equal).
Test Definition
Choose a Value or another Field.
Row, Col1, Col2
Fill in the information corresponding to the position on the screen or when you choose a field from the Copy Data window,
the information pertaining to row, column, and field of the condition are automatically entered. For instance, in the dialog
box shown above, when the highlighted field was selected, the row and column details and the corresponding name information
(Agent Communications Menu) were automatically filled in the appropriate parameters.
|
| 4. | Click Apply to update your simple condition. Every time the logical tree is changed the corresponding logical expression at the bottom is updated to match the tree.
|
Notes
| • | A TRUE (FALSE) node cannot be transformed to a compound condition. |
| • | A node that has a TRUE (FALSE) child cannot be transformed to a compound condition. |
| • | If you are not connected then the list of fields will not be populated. |
| • | If you are connected but the current screen in the emulation window does not match the selected screen node, then the list of fields will not be populated. |
Tip
You can skip screen validation (done automatically for every screen) by editing the definition of the screen (select screen
node and click on the ellipsis next to the Definition property). When the dialog box is open, select the condition in the
top left corner box and click on the Delete button. This will change the condition to TRUE meaning the pool service will not
validate the screen by looking for certain text on it.