Recording a navigation
To record a navigation, follow the steps below.
| 1. | On the HFLIClass1.hfxml toolbar click (see the diagram below) on the Start/Stop button to start recording a navigation session. The navigation root is added to the navigation tree. Select this root to
view its properties in the Property Grid. Set the Begin Action and the End Action to Connect and Disconnect respectively.
 |
| 2. | On the toolbar click on the Connect button. The Connection Settings dialog box appears. In the Settings dialog box set the values (or make sure they already
are) as follows: 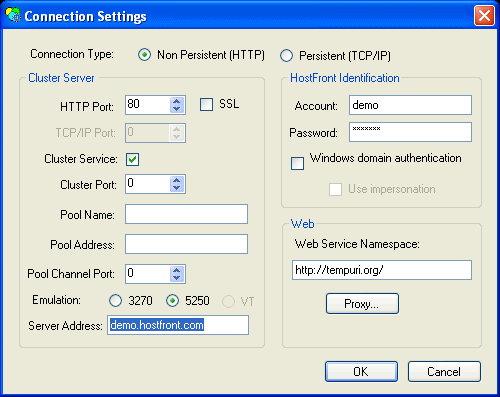 Provide relevant information for the following parameters in the Connection Settings window:
|
| 3. | Click on the Recording button and the Navigation node appears. |
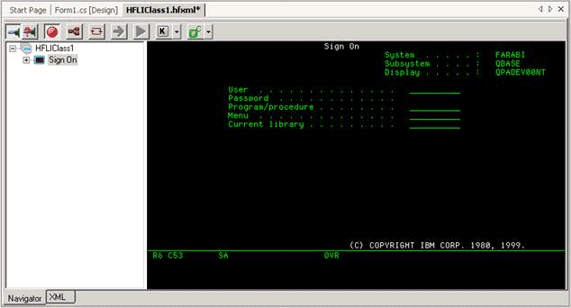
| 4. | Click on the Connect button and the screen on the host server appears. In the example below the Pool Manager is connecting to the system sign-on
screen on the AS400 server. Navigate as a normal operator would do using the terminal emulator. Notice that a PutField node is added to the navigation
tree for each field that you type in the green screen. If you pushed a key to go the next screen then a PushKey node is added
for this key and a new screen node is added to the navigation as well. Navigate through the screens until you reach the last
screen where you want your pool to "park".
|
| 5. | Click Recording Start/Stop to end recording. |
| 6. | Click to save the navigation. Your navigation is now recorded and saved and ready to be used by the Pool Manager service. The HFLI connects to the Server and receives the first screen. This screen is displayed in the emulation window and, if we
are still in recording mode (the Start/Stop a navigation recording toolbar button shows as pressed), a node is added to the
navigation tree. Each screen in the navigation will be represented by a node in the tree. This Screen Node defines the screen
uniquely and holds all the persistent data related to that screen (Its name, definition, inputs, outputs...).
Note that by default, the name of the screen is determined according to the following mechanism:
 |
| 7. | Select the screen node from the navigation tree to view its properties in the property grid. Locate the Definition property and click on the ellipsis next to it. This will display the condition editor to help you define this screen. Defining a screen means choosing as many features on this screen as necessary to make it uniquely identifiable among all the screens of this navigation. Defining a screen is crucial both at design time and run time of the resulting code (HFClass) to make them able to decide if they are on the expected track or not. The default definition of a screen is its Title which is, in most cases, enough and you need not add any other features unless there are other screens that have the same title in this navigation. After defining the screen, close the condition editor. |
| 8. | Expand the screen node to view its sub items. 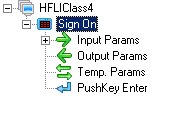 |
| 9. | Select each one of the newly added nodes to view their properties in the property grid.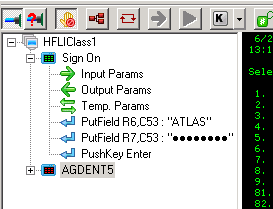 |
| 10. | While still in recording mode, proceed through the screens in the emulator until you reach the screen from which you need to collect output. |
| 11. | When on the Output screen, press Ctrl and drag the field you want to have as an output to the Output Params node of the corresponding
screen. The above process will generate a public string "Output" member on the HFNavigationResult class. If the dragged field has
a title next to it, the string will be named after that title. If it does not have a title, the string will then be named
Output_i where 'i' increases with every output.
As shown below, you can also get an output as a complete row or part of it (a sub string). To do so, right click on the screen
node and select Insert Item then select Get Row.
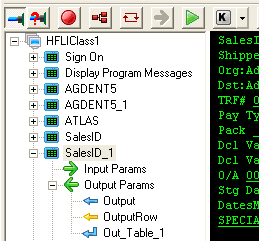
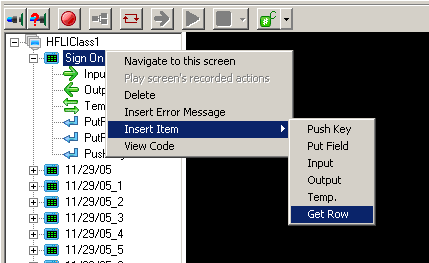 This above action will insert a new node under the Output Params node with a yellow left arrow to differentiate it from the
Get Field output parameter. After inserting the Get Row output parameter, select it and modify the properties to set the row,
start column, end column and name of the output.
 |
| 12. | You can now navigate back out of the application and logoff from the host system. All of the above-mentioned actions are recorded as navigation nodes. |
| 13. | You now have a complete Navigation that contains all the screens from the first screen to the one that has your output results and back to proper logoff. You can now define the output code required, be it a Web service or Class. To do that, click on the Class/Web Service button on the tool bar and select the option you need. This sample uses the C# Class option. |
| 14. | Click to save the navigation. Notice that another file HFClass.cs (or HFClass.vb or HFClass.asmx depending on the application language and the selected code type) is created and added to your project. |
Tip
If you need to get all the fields in a screen as input (or output) parameters, when you are connected to that screen and recording
is active, right click on the Input Params (or Output Params) node and select Get All Fields. This will get all the fields
in the screen to the selected node.