Record a macro
To record a macro, click on the record button in the toolbar ( ). You will be prompted to enter a name and a description for the macro.
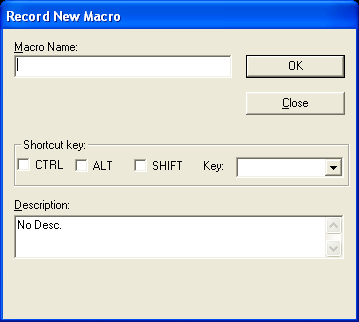
Macro Name
Type a name for the macro. Macro names must start with a letter. All macros files are saved in one folder under the Documents and Setting/User/Application Data/Seagull Software. Macro files have a .HFM extension and each file will have one macro. The path and the file name will be displayed after
you click the OK button for confirmation.
Shortcut key
If you want to create a shortcut key for the marco, check any combination of the provided check boxes, CTRL, ALT, and/or SHIFT and select one of the available options in the Key drop-down menu.
Description
Type a description of the macro.
Once you enter a name and click OK, you can start recording your actions. The macro recorder records only keyboard strokes and not mouse clicks or toolbar button
clicks. It will however record the Connect/Disconnect and Sign on actions done using the toolbar buttons. While recording,
the following floating toolbar will be displayed:
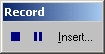
The three buttons are: Stop, Pause and Insert.
| • | The Stop button stops the recorder and saves the file. This should be used to finish recording. |
| • | The Pause button stops the recording temporarily and then resumes it when clicked again. This button works in conjunction with the Insert button also. |
| • | The Insert button is used to insert special advanced macro commands into the macro script. To use the Insert button, you should
first Pause the macro then click on the Insert button. When you that, you get the following dialog box: |
Using this dialog box, you can insert one of four commands into the macro scripts while recording it. These commands are:
(for more details on the commands see the Macro Commands section)
After you have configured the commands you want, click OK and then click the Pause button again and resume recording the macro.
| • | WaitforText |
| • | WaitforCursor |
| • | SetCursorPos |
| • | MsgBox (this is a VBScript command) |