User properties
After creating users, you can change their configuration using the User Properties dialog box which you can access by doing
one of the following:
| • | In the cluster tree, select the Users node (under the Groups node) and then in the right pane, double-click on a user's name. |
| • | In the cluster tree in the left pane, click on the Users node and then in the right pane, right-click on a user’s name and select Properties. |
Certain parts of the User Properties dialog box are disabled depending on the authentication type of the group to which it
belongs. The Security tab (except for the User IP Address validation) and most of the Account tab information are disabled
for users using Windows Domain, RSA SecurID or Novell iChain authentication types as these authentication types use external
components (e.g. Windows ADS, RSA Ace server) to perform the authentication task. Other parameters are similar for all users.
General tab
If you select the Use Group properties check box in the Account tab, then the user configuration uses its group parameters and this tab is disabled. If you deselect the check box, you can
access all the configuration settings for the current user.
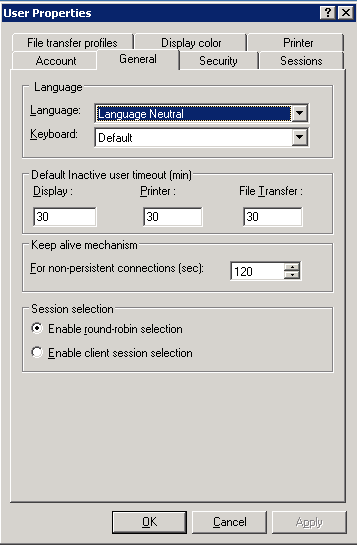
Language
Contains all the languages supported by [emulation] servers and clients (for the emulation). You can select the language to
use from this list.
Keyboard
Contains all the keyboards available for the selected language. Select the user’s preferred keyboard from this list.
Default Inactive user timeout (min)
Sets the time, in minutes, for each session type that the server waits for the next user interaction before it drops the sessions
due to user inactivity.
| • | Display: Sets the time the server waits before it drops the session due to user inactivity during a display session. |
| • | Printer: Sets the time the server waits before it drops the session due to user inactivity during a printer session. |
| • | File Transfer: Sets the time the server waits before it drops the session due to user inactivity during a file transfer session. |
Keep alive mechanism
Allows you to define a time interval in seconds according to which the server will verify that the client is alive. The default
value is 120 sec (or 2 min).
Session selection
Allows you to define the option by which the user can connect to a session. If the user has access to more than one session
, you can provide them with one of the following options:
| • | Enable round-robin selection: After signing on, the user will be connected to any one of the available sessions that are defined for him/her by means of a round-robin mechanism. |
| • | Enable client session selection: After signing on, the user is presented with a list of the sessions defined for him/her and he/she will be able to select which session to connect to. |
Security tab
If you select the Use Group properties check box in the Account tab, then the configuration uses the group parameters and this tab is disabled. If you deselect the check box, you can access
all of the configuration settings for this user. The options available on this page depend on the authentication type of
the group. For Windows Domain, RSA SecurID and Novell iChain authentication types, all the options except the User IP Address
validation are disabled as the properties do not apply to those users. Only UserID/Password authenticated users can access
all the options on this page.
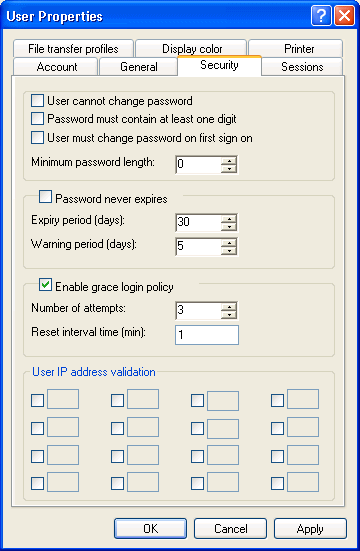
User cannot change password
Disables the Change password button on the client's ActiveX control toolbar preventing him/her from changing their passwords.
Password must contain a digit
Enhances password complexity.
User must change password at first sign on
Forces users to replace the passwords assigned to them by the administrator and define their own new passwords the first time
they connect to the cluster.
Minimum password length
Defines a minimum acceptable length policy for the user password. If the field is set to zero, a password of any length will
be acceptable, even an empty password.
Password never expires
Deselect the check box to force users to change their passwords at regular intervals set by the Expiry period field. The Warning period field defines the number of days before the end of the Expiry period during which HAM sends the user a warning notification
to change their password. The notification stops once the user changes the password. If the user does not change the password
by the end of the expiry period, they cannot sign on until they change it.
Enable grace login policy
Defines a policy to block users who attempt to sign on with the wrong password. The Number of attempts field defines the number of times the user can enter a wrong password before the account is locked. The Reset interval time field defines the time (in minutes) after which the system automatically unlocks a locked account.
User IP address validation
Defines IP address filters or access lists for the user. HAM allows you to define up to four subnets. The cluster accepts
connections only if the user's IP address belongs to the defined subnets. For example, if you define 10.1.1 and 10.1.2, then
the user can connect only if their IP address is in the ranges 10.1.1.0 to 10.1.1.255 and 10.1.2.0 to 10.1.2.255.
Printer tab
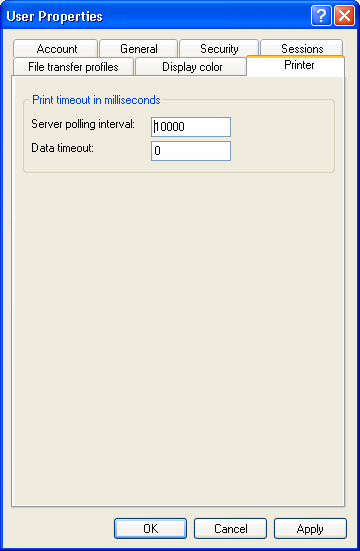
Server polling interval
The number of milliseconds the client waits before checking with the Server for any available print jobs. It is recommended
that you keep this interval at ten seconds.
Data Timeout
The amount of time to wait for the data at the end of a print job in the field. This amount of time is measured in milliseconds.
File transfer profiles tab
The file transfer profiles can be used as both an automation tool as well as a security tool. If a user is not assigned a
file transfer profile, then they will be able to browse host and PC files restricted only by the policies defined for them
in the respective environment.
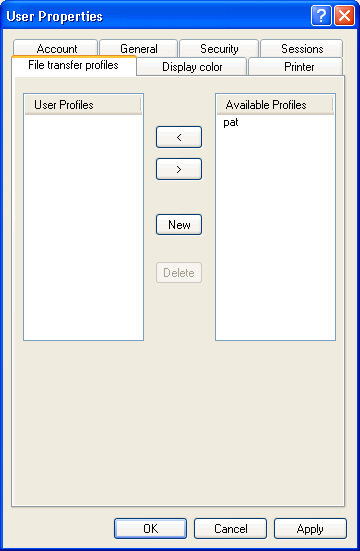
By assigning File Transfer profiles, the administrator can restrict a user's access to specific files as well as their direction
of transfer. The File Transfer profiles feature allows an administrator to assign specific upload and download profiles (assuming
the File Transfer profiles have already been created by the administrator and put in the profile database) to a user. If the
administrator assigns File Transfer profiles to a user, then that user can only transfer files according to the parameters
of those assigned profiles. The File Transfer profile feature includes the following security and automation enhancements:
| • | Prevents unauthorized users from browsing host files or members. Users can only upload or download designated files to designated locations. |
| • | Users cannot modify file transfer profiles. |
| • | File transfer profiles reside in the profile database. |
Note
You can assign multiple profiles to a user, the administrator can still grant a user complete File Transfer rights by not
assigning any profiles to that user. When the user connects to a file transfer session, the server sends the file transfer
profiles to the File Transfer ActiveX control. Upon receiving the profiles, the file transfer ActiveX control does not provide
the user with the usual interface to browse files. Instead, it executes the instructions given in the file transfer profile.
Use the User Properties tab to assign File Transfer profiles to users. To use this tab, you must first create profiles.
User Profiles
Displays all the File Transfer profiles assigned to this user.
Available Profiles
Shows the profiles already existing in the database. If the list is empty or if you want to add a new one, click New. This opens a standard File Open dialog box. Select the file transfer profile from your disk or network drive and click Open. The selected file appears in the Available Profiles list.
<
Moves the selected profile from the Available Profiles list to the User Profiles list.
>
Removes the selected profile from the User Profile list and back to the Available Profiles list.
Delete
Deletes the selected profile from the User Profiles and Available Profiles lists.
Sessions tab
Use this tab to customize the user session assignment. To use this tab, you should first create sessions and assign them to
the user’s group.
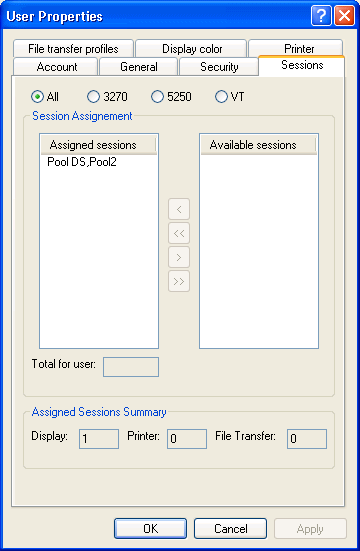
Available sessions
Displays the sessions that are assigned to the user’s group but which are not yet assigned to this user. The user cannot connect
to sessions in this list. For the user to use a session it has to be assigned to him/her.
Assigned sessions
Displays the sessions that are assigned to the user. If you selected the Available to all users check box when you assigned a pool or a single session to the user’s group the pool or single session will be displayed in
this list.
All, 3270, 5250 and VT
Display filters that control what types of sessions are displayed in the Available sessions and Assigned sessions lists. If
you select All (the default), sessions from all three emulation types are displayed. If you select 3270 for example, then
only 3270 sessions will be displayed. Use these buttons when you have multiple sessions of different emulation types assigned
to the user and you want to ease the visual management of the session assignment.
<
Assigns one selected available session (or pool) to the user.
<<
Assigns all the available sessions (pools) to the user.
>
Removes an assigned session (pool) from the user.
>>
Removes all assigned sessions (pools) from the user.
Total for user
Displays the number of sessions available for this user from the selected pool. By default, this is the value entered as the
Default number of sessions per user when the pool was assigned to the group. You can enter another value in this field to
override the default number without affecting other group members. For example, you can give one user in the group access
to 5 sessions from a pool while all other users will have the default 2 sessions from the same pool. If you select a single
session, this field shows a value of 1 and is disabled. The value entered in this field should be equal to or less than the
pool size assigned to the group.
Assigned Sessions Summary
Displays the total number of sessions (of every type) assigned to this user.
Display color tab
This tab allows you to select colors for a variety of elements within the ActiveX Display client. Select the element to change
from the Host color drop-down menu. When you select an element, its associated color appears in the sample edit box below. The possible elements
are the Background and Foreground colors.
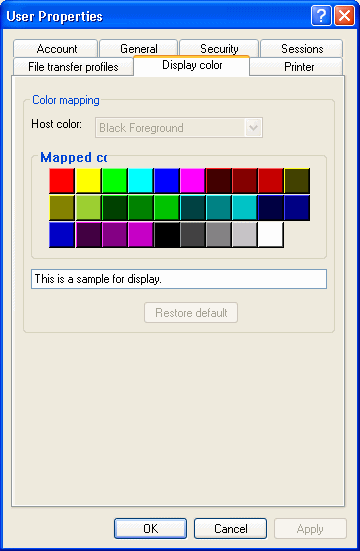
Background color
The color of the area behind the displayed text.
Foreground color
The color of the displayed text.
By default, the text and background of different areas of a host Display screen are painted in different colors. The following
colors are the default colors set by the host for the various Background and Foreground regions of the host Display screen:
When you click on a color button in the Mapped colors section, the sample color box below the group changes to reflect the new color selection. Repeat these steps for each color
or field that you want to change.
| • | Black |
| • | Blue |
| • | Green |
| • | Red |
| • | Cyan |
| • | Magenta |
| • | Yellow |
| • | White |
| • | Panel Background is the background color for the applet window. |
| • | Protected Foreground is the color of the text in protected fields such as the password field. |
| • | Edit Background is the background color of editable fields. |
| • | Status Foreground is the color of the text that appears on the status line. |
| • | Status Background is the background color of the status line. |