3270 service with TN3270 connection to host
Creating a single display session
|
1. |
Right-click on the Single Sessions sub-node and select New Display Session.
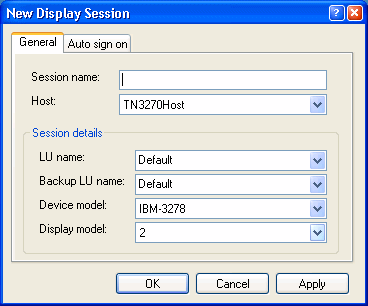
The New Display Session dialog box opens:
|
|
2. |
In the Session name field, type a descriptive name for the session. |
|
3. |
In the Host drop-down menu, select your TN3270 host (must be already created). |
|
4. |
In the LU name drop-down menu, select the Local LU for the session. Only the available Local LUs on the MS HIS Server appear in this box.
Leave the selection as Default to use the next available LU. |
|
5. |
If available, select a Backup LU name in case the main device is not available. |
|
6. |
From the Device model drop-down menu, select the appropriate device model to use. The available options are:
|
• |
Model 2 — 24 lines by 80 columns
|
|
• |
Model 3 — 32 lines by 80 columns
|
|
• |
Model 4 — 43 lines by 80 columns
|
|
• |
Model 5 — 27 lines by 132 columns
|
|
Note
The Auto sign on feature does not apply to TN3270 display sessions.
Creating a pool of display sessions
|
1. |
Right-click on the Pools sub-node and select New session pool display.
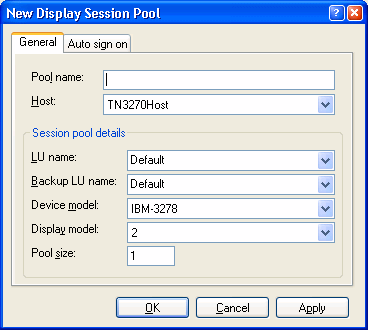
The New Display Session Pool dialog box opens:
|
|
2. |
In the Pool name field, type a descriptive name for the session. |
|
3. |
In the Host drop-down menu, select your TN3270 host (must be already created). |
|
4. |
In the Session pool details section, define the remaining parameters for the pool:
|
a. |
In the LU name drop-down menu, select the LU pool for the sessions. Leave the selection as Default to use the next available LU. |
|
b. |
In the Device model drop-down menu, select the appropriate device model to use.
|
• |
Model 2 — 24 lines by 80 columns
|
|
• |
Model 3 — 32 lines by 80 columns
|
|
• |
Model 4 — 43 lines by 80 columns
|
|
• |
Model 5 — 27 lines by 132 columns
|
|
|
c. |
In the Pool size field, type the pool size. The pool size defines the maximum number of concurrent sessions that can connect to the defined
host using this pool definition. |
|
Note
The Auto sign on feature does not apply to TN3270 display sessions.
Creating a single printer session
|
1. |
Right-click on the Single Sessions sub-node and select New Printer Session.
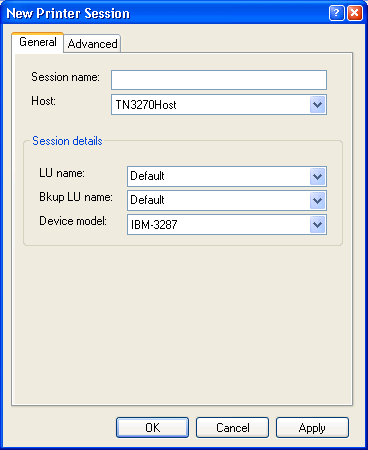
The New Printer Session dialog box opens:
|
|
2. |
In the Session name field, type a descriptive name for the session. |
|
3. |
In the Host drop-down menu, select your TN3270 host (must be already created). |
|
4. |
In the LU name drop-down menu, select the name of the LU for this session. Leave the selection as Default to be allocated the next available device. |
|
5. |
If you have a backup LU name, select it in the Backup LU name drop-down menu in case the main LU is not available. |
|
6. |
In the Device model drop-down menu, select the appropriate device model that you need to use. |
Note
The Advanced tab does not apply to 3270 sessions.
Creating a single file transfer session
|
1. |
Right-click on the Single Sessions sub-node and select New File Transfer session.
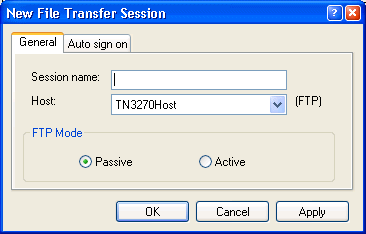
The New File Transfer Session dialog box opens:
|
|
2. |
In the Session name field, type a descriptive name for the session. |
|
3. |
In the Host drop-down menu, select your TN3270 host (must be already created). |
|
4. |
In the FTP mode section, select the type of FTP file transfer to use. |
|
5. |
Click the Auto sign on tab to enable and configure the automatic sign-on features for the 3270 host.
|
a. |
To enable the feature, select the Enable auto sign on check box. |
|
b. |
Type the User ID and Password in the corresponding fields. |
|
Creating pool of file transfer sessions
|
1. |
Right-click on the Pools sub-node and select New session pool file transfer.
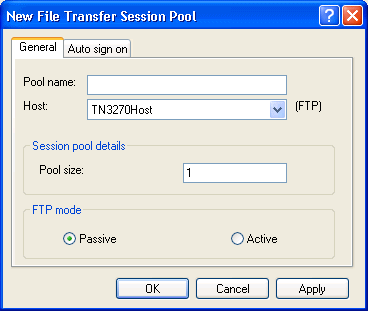
The New File Transfer Session Pool dialog box opens:
|
|
2. |
In the Session name field, type a descriptive name for the session. |
|
3. |
In the Host drop-down menu, select your TN3270 host (must be already created). |
|
4. |
In the Pool size field, type the number of file transfer sessions that this pool can have. This will be the maximum number of concurrent users
that this pool can serve. |
|
5. |
In the FTP mode section, select the type of FTP file transfer to use. |
|
6. |
Click the Auto sign on tab to enable and configure the automatic sign-on features for the 3270 host.
|
a. |
To enable the feature, select the Enable auto sign on check box. |
|
b. |
Type the User ID and Password in the corresponding fields. |
|
