5250 service with SNA/APPC connection to host
Creating a single display session
|
1. |
Right-click on the Single Sessions sub-node and select New Display Session.
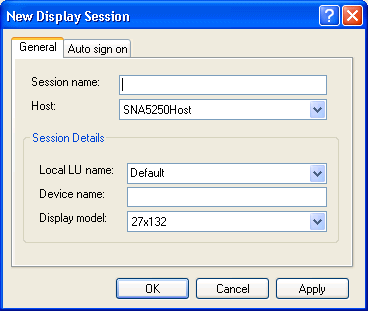
The New Display Session dialog box opens:
|
|
2. |
In the Session name field, type a descriptive name for the session. |
|
3. |
In the Host drop-down menu, select your SNA5250 host (must be already created). |
|
4. |
In the Local LU name drop-down menu, select the Local LU for the session. Only the available Local LUs appear in this box. |
|
5. |
In the Device name field, type the device to be used by this session. This is an eight character alphanumeric string that identifies the session
on the AS/400. Leave the field empty to use the next available device from the host. |
|
6. |
In the Device model drop-down menu, select the appropriate device model to use. |
|
7. |
Click the Auto sign on tab to enable and configure the automatic sign on option to the AS/400 host.
|
a. |
To enable this feature, select the Enable auto sign on check box. |
|
b. |
Type the User ID and Password in the corresponding fields. The remaining fields are optional.
|
|
Creating pool display sessions
|
1. |
Right-click on the Pools sub-node and select New Pool Display Session.
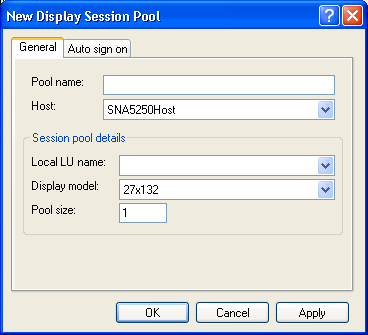
The New Display Session Pool dialog box opens:
|
|
2. |
In the Pool name field, type a descriptive name for the session. |
|
3. |
In the Host drop-down menu, select your SNA5250 host (must be already created). |
|
4. |
In the Session pool details section, define the parameters for the pool:
|
a. |
In the Local LU name drop-down menu, select which Local LU should grant the session. Only the available Local LUs appear in this box. This can
be the name of an LU pool on the MS HIS server equal to or larger than the Pool size. |
|
b. |
In the Display model drop-down menu, select the appropriate model. |
|
c. |
In the Pool size field, type the size for this pool. The pool size defines the maximum number of concurrent sessions that can connect to the
defined host using this pool definition. |
|
Creating a single printer session
|
1. |
Right-click on the Single Sessions sub-node and select New Printer Session.
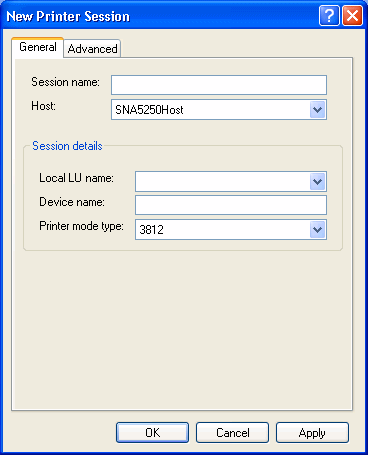
The New Printer Session dialog box opens:
|
|
2. |
In the Session name field, type a descriptive name for the session. |
|
3. |
From the Host drop-down menu, select your SNA5250 host (must be already created). |
|
4. |
In the Local LU name drop-down menu, select the Local LU for the session. Only the available Local LUs on the server appear in this box. |
|
5. |
In the Device name field, type the name of the device to use with this session. This is an eight character alphanumeric string that identifies
the session on the AS/400. Leave this field empty to be allocated the next available device from the host. |
|
6. |
In the Printer mode type drop-down menu, select the appropriate mode to use. |
|
7. |
Click the Advanced tab to configure Printer options for both APPC and TN connections. 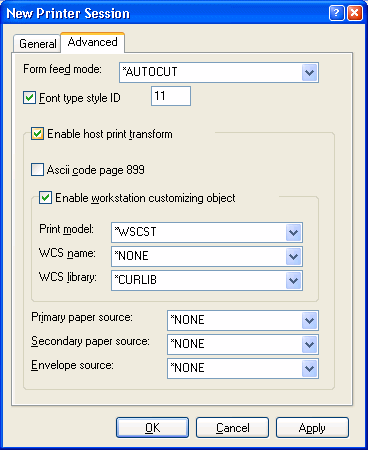
|
a. |
In the Form feed mode drop-down menu, select how to end a print job when the [emulation] server receives a Form Feed character. |
|
b. |
Select the Font type style ID check box and type a value representing the font size for your print jobs. |
|
c. |
Select the Enable host print transform check box to enable the remainder of the dialog box.
|
1. |
Specify ASCII code support and the Printer model.
|
|
2. |
When checked, ASCII Code specifies that ASCII is used. |
|
3. |
When checked, the Enable workstation customizing object feature enables the following lists:
|
• |
You must specify a printer manufacturer type in the Printer model drop-down menu. The AS/400 will use this model of printer to print host print jobs.
|
|
• |
WCS name names the object containing the definitions of the workstation customization tables for this device.
|
|
• |
WCS library specifies the location of the workstation customizing object.
|
|
|
4. |
Primary paper source specifies the primary paper source on the host printer.
|
|
5. |
Secondary paper source specifies the secondary paper source on the host printer.
|
|
6. |
Envelope source specifies the envelope source on the host printer.
|
|
|
Creating a single APPC file transfer session
|
1. |
Right-click on the Single Sessions sub-node and select New File Transfer Session.
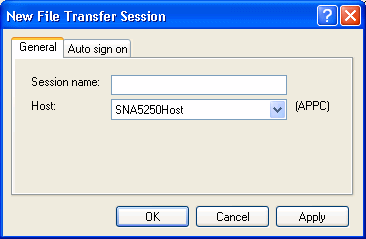
The New File Transfer Session dialog box opens:
|
|
2. |
In the Session name field, type a descriptive name for the session. |
|
3. |
In the Host drop-down menu, select your SNA5250 host (must be already created). |
|
4. |
Click the Auto sign on tab to enable and configure the automatic sign on option for the AS/400 host.
|
a. |
To enable this feature, select the Enable auto sign on check box. |
|
b. |
Type the User ID and Password in the corresponding fields. |
|
Creating pool file transfer sessions
|
1. |
Right-click on the Pools sub-node and select New File Transfer Session Pool.
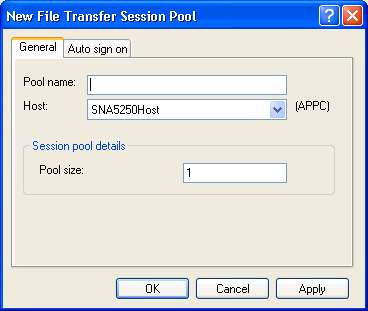
The New File Transfer Session Pool dialog box opens:
|
|
2. |
In the Pool name field, type a descriptive name for the session. |
|
3. |
In the Host drop-down menu, select your SNA5250 host (must be already created). |
|
4. |
In the Pool size field, type the number of file transfer sessions for the pool. This will be the maximum number of concurrent users that this
pool can serve. |
