Script events
A BlueZone script has the ability to execute all menu commands from the BlueZone Display and has the ability to send all host
key sequences to the host system. Script events are used to add flow control and user input to BlueZone scripts. In addition,
script events can be used to gain the attention of the user, add comments to a script file, and to execute programs on the
workstation.
The examples following the script event statements below, reflect what appears in the script view window in BlueZone Script
Editor. BlueZone Scripting is a GUI scripting language, meaning that there is no syntax to learn or text files to maintain.
Scripts are created by adding, editing, and deleting script statements. BlueZone script files are small because they are
a binary representation of the script. BlueZone script files can only be viewed and modified by using the BlueZone Script
Editor.
The following is a list of the currently supported Script Events in BlueZone Scripting:
Beep
Causes the PC speaker to produce a sound. Place the Beep Script Event in your script at the point where you want a beep to
be heard.
Example: Place the Beep Script Event immediately before the Input Script Event if you want a beep to be sounded when the Input
Dialog is displayed to the user to get their attention.
Clear_Watch
Halts all previous Watch_For statements. See Watch_For for more information.
Example: Clear_Watch
;Comment
Used to add remarks and/or blank lines to the script file. Using comments is good practice because it makes it easier for
you or others to know what that part of the script is doing.
Example: ;Comment This is where we start the logon process.
Goto
Causes script execution to begin at the specified label. See the Label command for more information.
Example: Goto SignOn
Input
Displays a customized User Input dialog during script execution. The Input Script Event can be used as a simple dialog that
captures the characters typed by the user such as their "Username". In this case Input must be followed by the Type Script
Event in order to "pass" the captured characters to the host screen. See Example 1 below.
Or, the Input Script Event can provide a mechanism for decision making based on user input and in this case is used in conjunction
with the If_Input_Is Script Event. See Example 2 below.
The following options are available for the Input dialog:
| • | Input a Character or |
| • | Input a String of Characters |
| • | Hide Input as User Types: This is important for hiding the End User's password during entry. |
| • | Maximum String Length: If desired, you can enter a value from 1 to 255 which will limit the number of characters the End User can enter into the input field. This is particularly helpful if the number of characters being correct is critical to the proper operation of the script. Like when you are expecting a two character state code and not the state name spelled out. |
Example 1: In this example, the script will prompt the user for their Username. In order for the characters to be passed
on to the screen, the Type Script Event must be placed into the script with the special characters "InputStr1". "InputStr1"
is actually a special variable name that is automatically assigned internally to the first Input Script Event in the script
which happens to be "Input Enter Username".
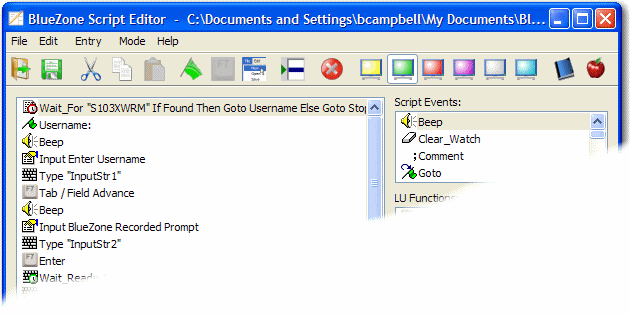
Here's how it works. When the first Input Script Event is used in a script, characters that are entered into the dialog by
the user, are automatically assigned to the variable "InputStr1". When the Type Script Event is encountered with the value
of "InputStr1", the character string assigned to the "InputStr1" variable, is sent to the host screen.
Refer to Use variables in scripts for more detailed information on using variables.
In the above script, there are two Input Script Events. The second Input Script Event, "Input Enter Password" is automatically
assigned to the variable "InputStr2". So after the user enters their password, the Type "InputStr2" will pass the user's
captured password to the host screen.
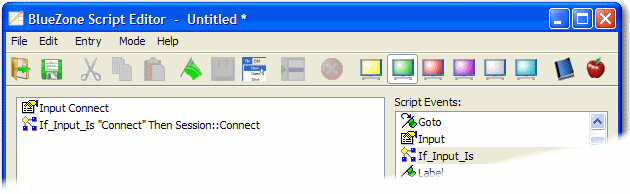
Example 2: In this example, the script is using the If_Input_Is Script Event in conjunction with the Input Script Event.
In this script, the user is prompted to type the word "Connect" if they want to connect to the host. "Input Connect" captures
the characters typed by the user. The If_Input_Is Script Event compares the captured characters to the characters "Connect".
If the characters match, then the command Session:Connect will be issued. If the characters do not match, then nothing happens.
If_Input_Is
Provides for the ability to determine user input. Used in conjunction with the Input Script Event.
Example: If_Input_Is Quit Then Goto End
Label
Used to specify a position in the script file where a Goto Script Event command can be used to continue script execution.
Example: Label SignOn
Message
Displays a message box with a "Ok" button containing some specified text to the user.
Example: Message Script completed successfully
Return
Causes script execution to continue with the statement following the last Goto Script Event command.
Example: Return
Run
Executes a program.
Example: Run NotePad.exe
Set_Cursor
Used to move the cursor to an exact position on the display by entering in the Row and Column number where you want the cursor
to be placed. Using this feature, as opposed to using the Cursor positioning functions, can save valuable script execution
time.
Example: Row 8 Column 18
Type
Used to type characters into the host session window starting at the current cursor position.
Example: Type UserId
Wait
Causes script execution to pause for the specified number of seconds.
Example: Wait 3
Wait_For
Causes script execution to suspend until the specified text string is found in the host session window. For example, you
can wait for the desired string starting from the very upper left hand corner of the screen and searching to the very end
of the screen. You can wait for the desired string starting at a specific row and column or you can wait for the desired
string only when found at a specific location on the screen.
In addition, you can also make the search case sensitive and add an optional "Timeout" value.
Refer to Use the Wait_For script event for more detailed information on using this feature.
Wait_Ready
Causes the script execution to suspend until the specified number of keyboard restores have been sent by the host. This prevents
the scripts from sending data to the host between keyboard restores, when the host is actually not ready. The number of keyboard
restores on a host screen is consistent and a more reliable means of controlling script execution than inserting timers after
each script event. The keyboard restore counter is on by default and is located adjacent to the "Ready" on the status line.
Example: Wait_Ready 3 Waits for 3 keyboard restores from the host before proceeding.
Wait_Until
Causes script execution to suspend until the specified time and date.
Example: Wait_Until 09-23-1999 17:30:28
Watch_For
Causes the script to search for the specified text in the host session window each time a host write occurs. If the text
is found then the associated statement is then executed. Execution of the script continues after the Watch_For statement.
Watch_For statements stay in effect until a Clear_Watch statement is encountered in the script.
Example: Watch_For Error Then Goto End