How to Create an iSeries Database File
Procedure
Launch a BlueZone iSeries
Display session.
From the BlueZone MenuBar, choose Transfer:Send/Receive.
The BlueZone
Host File Transfer desktop user interface will launch.
From the Host File Transfer
MenuBar choose Transfer:Create
iSeries Database File or, click the Create iSeries Database File
icon  located on the Host File Transfer Toolbar.
The PC
File Name dialog will be displayed. Browse
to the PC file that contains the data from which the iSeries file will
be created and click the Next
button.
The File
Type dialog will be displayed. BlueZone
will automatically choose the File Type based on the file structure of
the database file you chose in the previous step. For
example, if you chose an Excel spreadsheet, the File Type will be BIFF8.
Supported file types:
ASCII
- A simple text file format where the records are separated by CRLF
Basic
Sequential - Fixed-length
records; text based file format
BIFF8
- The Binary Interchange File Format is
used by Microsoft Excel (.XLS); binary based file format
CSV
- Comma-Separated Values; text based file format; fields separated by
comma; rows are separated by CRLF
DIF
- Data Interchange Format; text based file format
DOS
Random - Fixed-length records; text based file format
No
Conversion - The host data is stored as-is on the PC
Tab
Delimited - text based file format; fields separated by tab; rows
are separated by CRLF
Click the Next
button.
The FDF
File Name dialog will be displayed. Choose
the name of the FDF file or use the default name and click the Next
button.
The Data
Options dialog will be displayed.
Select the Data Options
that match the data in your file.
Date
Date
Format:
[DMY] Day/Month/Year
[EUR] European
[ISO] International Standards Organization
[JIS] JIS
[JUL] Julian
[MDY] Month/Day/Year
[USA] USA
[YMD] Year/Month/Day
Date
Separator: Not used in all Date Formats
[] Blank
[,] Comma
[.] Period
[/] Slash
[-] Dash
Time
Time
Format:
[EUR] European
[HMS] Hours/Minutes/Seconds
[ISO] International Standards Organization
[JIS] JIS
[USA] USA
Time
Separator: (Not used in all Time Formats)
[] Blank
[,] Comma
[.] Period
[:] Colon
Decimal
Decimal
Separator:
[,] Comma
[.] Period
Click the Next
button.
Click the Start
Scan button. BlueZone
will scan the PC data file to determine its contents. A
progress bar will show the progress of the scan.
The checkbox "First row of data contains
field names" should be checked to use the first row as field names
and the 2nd row will be used as the first row of data. If
unchecked the first row in the PC File will be used as the first row of
data.
You can skip the scan but you will be prompted
to continue.
If any errors are detected, you will receive
an error message with a description of the error. Fix
any errors and scan the file again. Keep
fixing errors until the file has been scanned successfully.
Click the Next
button.
The File
Contents dialog will be displayed. This
dialog is used to configure all the database fields. If
the file was successfully scanned then there should be a list of fields
already configured for you.
The Details
button will show a dialog with selected field's information.
Name: Field Name
Description: Optional description for the
field
Type: Field Type
BIGINT
CHARACTER
DATALINK
DATE
DECIMAL
DOUBLE
GRAPHIC
INTEGER
NUMERIC
REAL
SMALLINT
TIME
TIMESTAMP
UNICODE
VARCHAR
VARGRAPHIC
Length: Number of digits or number of characters
for the field
Scale: Number of digits after the decimal
CCSID: The host CCSID for the field
Default: The default value of the field
when empty
Allocate: Fixed length space allocated for
the field for VARCHAR and VARGRAPHICS
Padding: Allows for extra space in a CHARACTER
or GRAPHIC field
Null Capable: The field can contain null
values
In addition, you can bring up a pop-up menu
if you "right mouse click" on any of the entries as shown here:
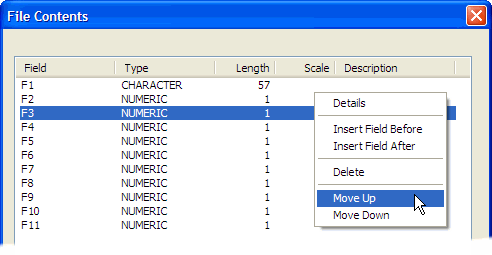
The pop-up menu will allow you to perform
additional operations on the entries like inserting new fields, deleting
entries, moving entries up or down.
When you are ready, click the Next
button.
The iSeries
Library/FileName dialog will be displayed. Enter
the iSeries File that will be created. You
must have authority in the specific Library. Click
the Next button.
The File
Description Text dialog will be displayed. This
is optional. If
desired, enter text that describes the iSeries file on the host. Click
Next to continue.
The Confirm
Settings dialog will be displayed. If
any of these settings are not correct, click the Back
button to back and make any necessary changes. When
you are satisfied with the settings, click the Finish
button.