 NOTE Not
all Telnet hosts support this feature.
NOTE Not
all Telnet hosts support this feature.Prior to establishing a host system connection, you must define a Host connection.
This section deals with Defining a New Connection. The BlueZone VT Define New Connection property sheet consists of Connection, Firewall,Security, and Certificate tabs.
Once you have defined at least one host connection in your Connection List, the Edit, Copy, and Remove buttons will become operable.
Telnet Connection ----
Connection Name: A unique name used to identify this collection of Connection settings.
Host Address: Specifies the computer name (in Internet format, known as DNS Name) or the IP address in either IPv4 or IPv6 format, of the host system.
TCP Port: Specifies the TCP port number. The default is 23.
Backup Host: Specifies the backup host to which BlueZone will connect, if the primary host is not available. Backup hosts are selected from the Connection List.
Terminal: Choose the Terminal Type that you want to emulate from the List box.
Terminal ID: The Terminal ID will automatically change with the chosen Terminal setting above, however, you can override this value with the setting of your choice.
Default Screen Size ----
Rows: Sets the number of displayable rows used by the host.
Columns: Sets the number of displayable columns used by the host.
The Emulation tab allows the configuration of emulation specific features.
Emulation Options ----
Auto-Login UserName: Place the desired UserName in this field if you want BlueZone to automatically send this information to the host upon connect. Otherwise, leave it blank.
NOTE Not
all Telnet hosts support this feature.
Answerback: Place the desired Answerback in this field, if any.
Local Echo: If enabled, BlueZone VT will display the characters (locally) pressed by the user for hosts that do not echo back the characters that are sent to it. If you are seeing double characters, then un-check this checkbox.
Force Auto Wrap: If enabled, BlueZone VT will force word wrapping of any characters that would normally extend off the right hand side of the screen. This will override the setting that is sent down from the host.
Disable Dimming Colors: If enabled, BlueZone VT's Character Dimming feature will be turned off. This can be helpful when it is difficult to distinguish dim characters on the screen.
 SEE VT
Session Colors for more information on selecting color options for
Bold and Dim intensities.
SEE VT
Session Colors for more information on selecting color options for
Bold and Dim intensities.
Disable 8-bit Control Characters: If enabled, BlueZone VT' will disable the use of 8-bit control characters.
Use ANSI Colors: If enabled, BlueZone VT will use ANSI Colors for VTXXX connections.
NOTE This
option does not apply to any other host type..
The Firewall tab allows the configuration of Firewall and Proxy Server sign on systems.
Firewall Options ----
Connect Through Firewall or Proxy Server: Check to enable this feature.
Firewall
Type: Choose the Firewall Type from the "drop down" list.
SOCKS4 Proxy
SOCKS4A Proxy
SOCKS5 Proxy
NVT Proxy or Firewall
Firewall Address: Enter the IP address of the Firewall.
Port: Enter the Port number used by the Firewall.
Timeout: Enter the appropriate Time out value.
User Name: Enter the appropriate User Name.
Password: Enter the appropriate Password.
NOTE If
you have chosen NVT Proxy or Firewall,
then you will need to provide the following additional information:
Host Name Prompt: Enter Firewall of network prompts BlueZone should look for.
User Name Prompt: Enter the User Name that the Firewall is expecting.
Password Prompt: Enter the Password that the Firewall is expecting.
Connected Prompt: Enter the appropriate Connected message that the Firewall transmits.
Security Options ----
The BlueZone VT emulator supports the SSL v3, TLS v1 or SSH v2. BlueZone VT may be pre configured for distribution with encryption configured and enabled eliminating the need for any end-user intervention in the installation or configuration process.
Security Options ----
Enable Secure Sockets Layer: Specifies whether the TCP connection to the host should be encrypted using SSL.
Encryption
Type ----
Specifies which type of encryption should be used.
SSL v3: (Default)- Specifies that SSL version 3 should be used.
TLS v1: Specifies that TLS version 1 should be used.
NOTE SSL
v3 and TLS v1 are nearly
identical. TLS
v1 is preferred.
SSH v2: Specifies that SSH version 2 should be used.
Invalid
Certificates ----
Specifies how to handle an invalid server certificate. Options include:
Always Reject: Specifies that an invalid server certificate should always be rejected.
Ask Before Accepting: (Default) Specifies that the user should be asked whether to accept an invalid server certificate.
Always Accept: Specifies that an invalid server certificate should always be accepted.
Preferred Cipher Suite: Specifies a specific SSL/TLS or SSH cipher suite (encryption algorithm) to use. The Preferred Cipher Suite list will change depending on whether SSL/TLS or SSH is selected. In SSL/TLS, you can allow the client and server to negotiate the cipher suite by selecting "None" which is the default. In SSH, a Preferred Cipher Suite must be selected. AES is the default.
NOTE This
product includes software developed by the OpenSSL Project for use in
the OpenSSL Toolkit (http://www.openssl.org/).
Client Certificate ----
These parameters specify the type of Client Certificate to use if any. Enable Secure Sockets Layer on the Security tab must be enabled in order for Client Certificate support to be active.
No Client Certificate - Specifies that a client certificate should not be presented.
Client Certificate in Disk File - Specifies that a client certificate should be presented.
Certificate File - Specifies the path to the Certificate File.
View - Use the View button to view the certificate.
Browse - Use the Browse button to locate the Certificate File.
Private Key File - Specifies the path to the Private Key File.
Browse - Use the browse button locate the Private Key File.
Client Certificate in Certificate Store - Specifies that a client certificate should be presented that is located in the Certificate Store.
Common Name - Specifies the path to the Common Name File.
View - Use the View button to view the certificate.
Browse - Use the browse button to display a list of certificates in the Certificate Store.
Client Certificate in Certificate on Smart Card - Specifies that a client certificate stored on a Smart Card should be presented.
Root Certificates ----
These parameters specify the which Root Certificate store to use. The one provided by OpenSSL, or the one that is provided by Windows.
Use OpenSSL Root Certifcates - (Default) If selected, the Root Certificates provided by OpenSSL will be used.
Use Windows Root Certificates - If selected, BlueZone will look will look for a file called rootcerts.pem in the End User's bluezone\certs directory. If it doesn't exist, it will automatically export the root certificates from Windows and store them there, giving a message such as ''109 root certificates were exported.''
Update Root Certificates - This button is used to manually export the certificates. If you connect and are presented with an untrusted host root certificate, and check the box to add it to the trusted list, it will import it into the Windows root store (which may produce a Windows message asking for confirmation), and then export the root store again to disk producing a message such as ''109 root certificates were exported.'' When this is performed one time, subsequent connections should connect without messages.
NOTE This
product includes software developed by the OpenSSL Project for use in
the OpenSSL Toolkit (http://www.openssl.org/).
Kerberos Authentication Protocol is an optional component that must be selected during the BlueZone installation process. If you do not see a Kerberos Tab in your Connection dialog, it means that your BlueZone Administrator did not enable the Kerberos component when BlueZone was installed on your machine.
SEE
The BlueZone Desktop Administrator's Guide - Chapter
2 - Installing BlueZone - Optional Installation Features - Enabling Kerberos
for information about installing the Kerberos Authentication feature.
Kerberos options ----
Enable Kerberos Authentication - To enable Kerberos Authentication for this session, place a check in this checkbox.
Use Windows Credentials - If enabled, your Windows credentials (User Name and Domain) will be used in lieu of Principal and Realm. Your User Name will be used as the Principal name and your Domain name will be used as the Realm name.
Forward Credentials - If enabled, your credentials will be forwarded to the remote session. The credentials are passed as a Kerberos message which includes, among other things, the forwarded Kerberos ticket and a session key associated with the ticket.
Principal - If you are not using your Windows credentials, enter your Principal name here.
Realm - If you are not using your Windows credentials, enter the Realm name here. Realm name must be entered in all CAPS.
Target - Enter the name of the Kerberos database.
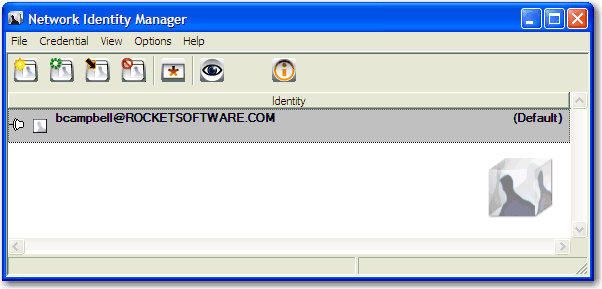
Manage Tickets - To Manage Kerberos Tickets, click this button. The Network Identity Manager will be displayed as shown here:
NOTE
Kerberos
is copyright © 1985-2009 by the Massachusetts Institute of Technology.
Related Topics:
VT Display Session Configuration