 Power Pad Editor
Power Pad Editor
The Editing ToolBar is used to align, center, space and size the various controls. The Editing ToolBar icons are gray when they are not active. To make them active, you will have to select one or more controls. In addition, there are icons to set the tab order, test the Power Pad and set the Power Pad options.
In order to use the features of the Editing ToolBar, you have to know how to select multiple controls.
After you have placed several Power Pad controls on the canvas, you can select any control by simply using your mouse pointer and left a single left click.
To select more than one Power Pad control, hold down the shift key and select each control with your mouse pointer and a single left click. Keep selecting until you have selected all the desired controls. Clicking away from the controls on a blank section of the canvas will de-select them.
The Editing Toolbar is divided into the following groups:
Alignment
![]() Used to align two or more controls.
Used to align two or more controls.
Centering
![]() Used to center one or more controls.
Used to center one or more controls.
Spacing
![]() Used to equalizes the space between tree or more controls.
Used to equalizes the space between tree or more controls.
Make
Same Size ![]() Used to make controls the same size.
Used to make controls the same size.
Set
Tab Order ![]() Used to set the order in which the tab
key moves the focus from button to button.
Used to set the order in which the tab
key moves the focus from button to button.
Test
Pad ![]() Used to launch the Power Pad in test mode.
Used to launch the Power Pad in test mode.
Options
![]() Used to set the grid settings of the Power Pad canvas.
Used to set the grid settings of the Power Pad canvas.
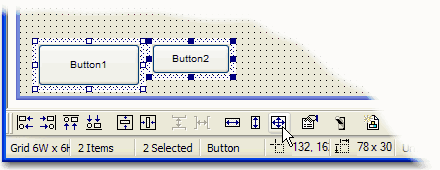
If you select two buttons, you can then choose from several icons on the Positioning ToolBar. To see the functions that various icons perform, mouse over the icons and a pop-up window will display the name of the function.
In the following example, selecting this icon ![]() will make the selected buttons the same height and width.
will make the selected buttons the same height and width.
Similarly, the other sizing icons can be used to make multiple controls the same width or the same height. In addition, other positioning icons can be used to align the selected controls to the left, right, top bottom, etc.
The two positioning icons control the spacing between groups of controls. Spacing is the only one that require at least three controls to be selected.
Related Topics: