 NOTE
In the
future, upgrading BlueZone Security Server version 4.2 to a higher version
will be easily accomplished via the Windows Installation Wizard and will
not require manual configuration.
NOTE
In the
future, upgrading BlueZone Security Server version 4.2 to a higher version
will be easily accomplished via the Windows Installation Wizard and will
not require manual configuration.Security Server Installation
Since the changes to BlueZone Security Server are so extensive, it is not possible to directly upgrade a currently installed version of SEAGULL Security Server's configuration to the current BlueZone Security Server. In essence, you must install the new BlueZone Security Server along side of the current SEAGULL Security Server and manually recreate the configuration.
This is accomplished by installing the new BlueZone Security Server and running your current version of SEAGULL Security Server Manager (not the Service) at the same time. This makes it possible to perform a side by side configuration of the currently installed SEAGULL Security Server's configuration to the new BlueZone Security Server.
NOTE
In the
future, upgrading BlueZone Security Server version 4.2 to a higher version
will be easily accomplished via the Windows Installation Wizard and will
not require manual configuration.
 IMPORTANT!
Do not
uninstall your current version of SEAGULL Security Server. You
will need to run the current SEAGULL Security Server Manager in order
to copy the configuration.
IMPORTANT!
Do not
uninstall your current version of SEAGULL Security Server. You
will need to run the current SEAGULL Security Server Manager in order
to copy the configuration.
Shutdown the currently installed SEAGULL Security Server Manager and stop the SEAGULL Security Server Service. As a precaution, in Windows Services, open the SEAGULL Security Server properties, and change the "Startup type" to disabled. This will prevent the SEAGULL Security Server Service form accidentally starting if you restart the server.
Install the new BlueZone Security Server just as if it is not an upgrade, but a new installation.
 SEE
Installing
Security Server for help with this.
SEE
Installing
Security Server for help with this.
Launch both the currently installed SEAGULL Security Server Manager and the new BlueZone Security Server Manager.
You should now be able to arrange the two Security Server Managers so that they are side by side. I suggest placing the old Security Server Manager in the left and the new Security Server Manager on the right.
Starting with Bindings, open the Bindings Properties on the old Security Server and using copy and paste, paste the Binding configuration into the Bindings configuration of the new Security Server.
 TIP
As a time
saver, try copy and pasting using the keyboard commands Copy = CTRL C
and Paste = CTRL V.
TIP
As a time
saver, try copy and pasting using the keyboard commands Copy = CTRL C
and Paste = CTRL V.
Now, copy the configuration of each of your Connections over to the new Security Server.
When all the Connections
have been copied, start the new Security Server by clicking the Start
![]() icon located on the ToolBar.
icon located on the ToolBar.
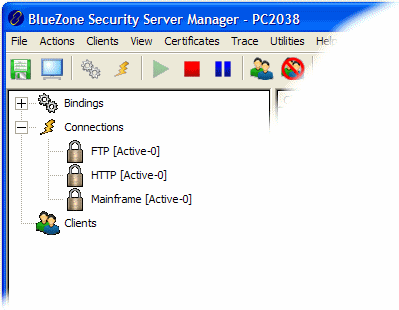
All your Connections should come up Active-0 as shown here:
If one or more of your Connections do not come up Active-0, review your settings. It might be a simple typo that is causing the problem.
The final step is to test all your Connections.
CAUTION!
You will
not be able to run both Security Server Services at the same time. The
reason is that if you copied the configuration from the old Security Server
to the new Security Server exactly, there will be duplicate ports defined
in both configurations. You
can not have two different services connected to the same port.
However, if for any reason you don't want to cut over the new BlueZone Security Server to production at this time, stop the BlueZone Security Server Service. You can now start the old Security Server's Service and verify that all your Connections are Active and working. When you are ready to cut over the new BlueZone Security Server, just reverse the process.
Congratulations! You have just upgraded your version of BlueZone Security Server.