There are four steps involved with Installing the Seagull Web Manager:
Insert the BlueZone CD-ROM into the CD drive of the Microsoft web server you wish to install Web Manager. An AutoRun program will launch and you will be presented with a SEAGULL BlueZone Software “Splash” screen.
Click the BlueZone Web-to-Host link.
Click the ASP Web Manager link. This will start the installation process.
The Web Manager "Splash" screen will display for a few seconds followed by the Seagull Web Manager Setup dialog. The Install Seagull Web Manager radio button will automatically be selected. Click the Next button.
The Seagull License Manager License dialog will be displayed. To continue, select the Yes radio button and click the Next button.
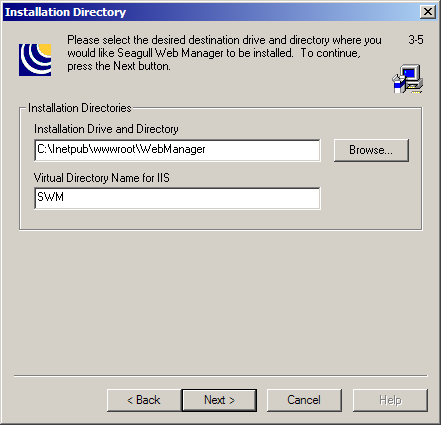
The Installation Directory dialog will be displayed as shown:

We recommend using the default value for the Installation Drive and Directory. You can choose any name you wish for the Virtual Directory. Click the Next button.
The Copy Seagull Activation File dialog will be displayed. If you have a Seagull Activation File, browse to it now. If you do not have an Seagull Activation File at this time, you can manually install it later. Click the Next button.
The Launch Selected Items dialog will be displayed. Select any items that you want to automatically launch immediately after the installation is completed. Click the Finish button.
The Seagull Web Manager files will now be copied to your web server. You will receive a Create Directory message. Answer Yes to this message.
After the Web Manager installation program is complete, you will receive the following message: “The Seagull Web Manager installation completed successfully”.
Click the OK button to continue.
Any items that you selected in the Launch Selected Items dialog above, will be launched now.
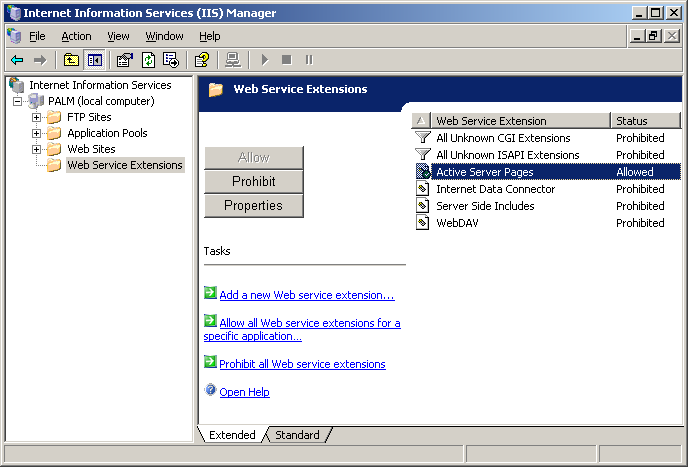
By default, IIS 6.0 prohibits Active Server Pages (ASP) web service extensions. In order for the ASP Web Manager to operate, Active Server Pages must be set to allowed.
Launch the Internet Information Services (IIS) Manager.
Expand the tree to show all the web sites.
Locate and select the Web Service Extensions folder.
On the right, select Active Server Pages and click the Allow button.
The Active Server Pages Status will change to Allowed as shown below:

By default, IIS 6.0 has the Parent Paths feature turned off. With this feature turned off, HTML relative links on ASP web pages will not work. Since the Seagull Web Manager uses relative links, this feature must be turned on.
Launch the Internet Information Services (IIS) Manager.
Expand the tree to show all the web sites.
Locate the web site under which Web Manager is installed.
With your mouse, highlight he web site, right click and select properties. The web site’s properties dialog will be displayed.
Select the Home Directory tab.
Click the Configuration button, then the Options tab. The Application Configuration dialog will be displayed as shown here:

Check the “Enable parent paths” check box.
Click the OK and OK again to close the dialog.
Using Internet Services Manager, locate the "SWM" virtual folder (or, whatever you named the virtual folder) that was created when you installed Web Manager.
With your mouse, highlight the "SWM" folder, right click and choose Permissions.
In the upper window, highlight the Internet Guest Account (Servername\IUSR_Servername).
In the lower window, in the Allow column, enable the Write checkbox.
Click the OK button to close the dialog.
Congratulations! The basic installation portion of the Web Manager is complete.