 NOTE If you are not upgrading a previous version of
BlueZone, you can go directly to the Desktop Installation
Procedure. Otherwise
please read the following Upgrade Procedure.
NOTE If you are not upgrading a previous version of
BlueZone, you can go directly to the Desktop Installation
Procedure. Otherwise
please read the following Upgrade Procedure.Existing Installations - If you already have BlueZone version 3.2 or earlier installed, please review the following Upgrade Procedure before proceeding.
NOTE If you are not upgrading a previous version of
BlueZone, you can go directly to the Desktop Installation
Procedure. Otherwise
please read the following Upgrade Procedure.
Upgrading BlueZone is very simple. All you have to do is install the new version of BlueZone right on top of your current version. Your BlueZone configurations will be preserved and automatically upgraded to the new version.
NOTE Very
important! - Please be aware that starting with version 3.3, BlueZone
now defaults to Profile Mode. Prior
to version 3.3 the default mode for BlueZone was Registry Mode. In
Registry Mode, all your BlueZone session configurations were stored in
the Windows registry. In
Profile Mode, all your session configurations are stored in files called
Profiles. To
convert to Profile Mode, all you have to do is install BlueZone (using
the default settings) on top of your current installation, and BlueZone
will automatically convert your Registry settings to Profiles.
During the installation you will receive the following message:
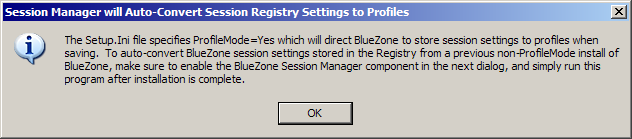
If you are converting from Registry Mode to Profile Mode, you may want BlueZone to automatically convert your BlueZone configuration Registry entries into Profiles. Profile Mode is the recommended mode for BlueZone. To take advantage of the automated conversion, make sure that you enable the new BlueZone Session Manager in the Program Group, Program Icons, Desktop Shortcuts dialog, during the upgrade, as shown here:
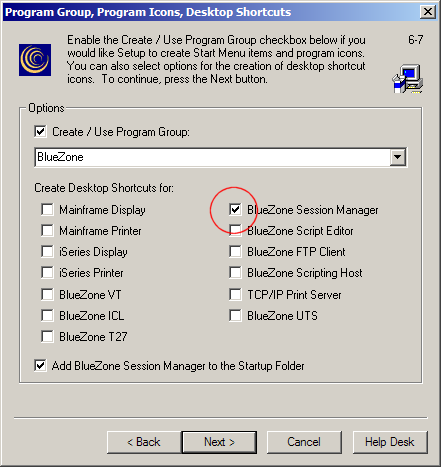
We recommend that you do not use the Desktop Shortcuts to launch BlueZone sessions. Instead, use the new Session Manager to launch your sessions. Keep in mind that if you already have BlueZone desktop shortcuts on your desktop, they will remain even if you have them un-checked in the above dialog.
By using the new Session Manager, BlueZone will automatically convert your BlueZone configuration Registry entries into Profiles. The following naming format will be used:
|
BlueZone Session |
Profile Name |
|
Mainframe Display, Session 1 |
Mainframe Display S1.zmd |
|
Mainframe Printer, Session 1 |
Mainframe Printer P1.zmp |
|
iSeries Display, Session 1 |
iSeries Display S1.zad |
|
iSeries Printer, Session 1 |
iSeries Printer P1.zap |
|
BlueZone VT Session 1 |
VT S1.zvt |
|
BlueZone FTP Session 1 |
FTP T1.zft |
|
BlueZone ICL Session 1 |
ICL S1.z7d |
|
BlueZone T27 Session 1 |
T27 S1.ztd |
|
BlueZone UTS Session 1 |
UTS S1.zud |
If you have more than one session defined, the file name will be named accordingly. For example, Mainframe Display Session 2 will be named Mainframe Display S2.zmd.
Later, you will see that in Profile Mode, BlueZone places the name of the Profile in the upper left hand corner of the emulator, immediately to the right of the session number. If you wish, you can change the name of the Profile to a name that is more meaningful.
If you are ready to upgrade, continue with the following Desktop Installation Procedure.
When the installation is complete, launch the new BlueZone Session Manager to convert your BlueZone configuration Registry entries into Profiles. Your BlueZone Registry entries will be automatically removed.
Installing BlueZone is quick and easy. BlueZone is shipped on the BlueZone CD-ROM. The BlueZone CD-ROM has an "Auto-run" program which will automatically launch the SEAGULL BlueZone Software "Splash Screen".
Insert the BlueZone CD-ROM into your computer's CD drive. The Welcome to BlueZone "Splash Screen" will appear.
Click on the BlueZone Desktop link and select BlueZone Desktop. You will be presented with the main BlueZone Set-up screen.
Leave the Workstation Installation radio button selected and click the Next button.
Respond to the BlueZone Software License Agreement screen by answering "Yes" and click the Next button.
Change the Installation and Working Directories as needed or take the default (recommended) and click the Next button.
Check or un-check BlueZone components as needed and click the Next button.
NOTE The
BlueZone "family" consists of several emulators including; BlueZone Mainframe,
BlueZone iSeries,
BlueZone VT,
BlueZone FTP
as well as several utility programs. During
Setup, you can select which modules to install. All
available modules are checked by default.
Choose your Preferred Connection Type (usually TN3270E / TN5250E) and click the Next button.
Take the default for Create / Use Program Group unless you want to call it something different. Choose any items you wish to have desktop shortcuts created, or take the default (recommended) and click the Next button.
Choose any items from the displayed list that you want to automatically launch immediately after the installation is completed and click the Finish button.
The BlueZone files will be installed and you will receive a message that the BlueZone installation was completed successfully.
Click the OK button. You will immediately receive the following message:
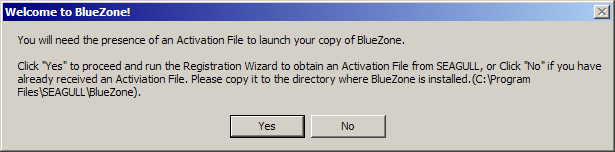
If you have a valid BlueZone License in the form of a SEAGULL Activation File (seagull.saf), copy it to the location shown in your message box, and click the No button to complete the installation.
If you have a BlueZone Installation Key, click the Yes button to start the SEAGULL Registration Wizard.
For help with the SEAGULL Registration Wizard click here.
 TIP BlueZone
may be pre-configured and distributed using several methods, including
Zero Footprint Server Installation
and Quiet Mode Installation. See
the BlueZone Desktop Administrator's Guide
for additional information.
TIP BlueZone
may be pre-configured and distributed using several methods, including
Zero Footprint Server Installation
and Quiet Mode Installation. See
the BlueZone Desktop Administrator's Guide
for additional information.
The BlueZone Desktop Administrator's Guide (BzAdmin.doc) is provided on the BlueZone CD-ROM and can be found in the DOCS folder.