 NOTE Do
not use Shared Folders as not all the BlueZone files on the CD conform
to the Windows 8.3 naming convention.
NOTE Do
not use Shared Folders as not all the BlueZone files on the CD conform
to the Windows 8.3 naming convention.|
Installation |
BlueZone Web-to-Host |
This procedure is written under the assumption that the HTTP services are already configured and running on the iSeries (AS/400) host. This procedure only covers the initial installation and configuration of BlueZone Web-to-Host on the iSeries HTTP Web Server. It does not cover the configuration of BlueZone Web-to-Host.
Create a folder in the root of the iSeries Web Server. (example: bluezone).
On a Windows PC, launch the BlueZone CD-ROM, and using Windows Explorer, view it’s contents, specifically the BlueZone Web-to-Host folder.
For your convenience, we have provided .tar and .gz files which contain the entire contents of the BlueZone Web-to-Host folder.
These files are called bzw2h.tar and bzw2h.tar.gz
FTP the .tar or .gz file to your web server to the "bluezone" directory.
To expand the .gz file type:
gzip -c
-d bzw2h.tar.gz
| tar xvf -
To expand the .tar file type:
tar -xvf bzw2h.tar
NOTE Do
not use Shared Folders as not all the BlueZone files on the CD conform
to the Windows 8.3 naming convention.
Upload the SEAGULL Activation File (seagull.saf) you received from your Seagull Software Account Manager or Seagull Software Order Administration, as BINARY and replace the existing seagull.saf file. The SAF file contains license information and is required for the BlueZone session to run once it is downloaded to the browser.
NOTE If
you don't have a Seagull Activation File, or you don't know what a Seagull
Activation File is, you can skip this step and continue with the installation.
You can
install the SAF file at a later time. Click here for help
in obtaining and manually installing a SAF file.
Once all the directories and files have been uploaded to the host, you must make the following changes to allow access to BlueZone Web-to-Host.
While logged on with QSECOFR authority, you will need to update the HTTP configuration file. On the command line execute: WRKHTTPCFG
At the bottom (end) of the existing entries, add a line.
Now add the value: pass /bluezone/* /bluezone/* as shown in the following “screen shot”.
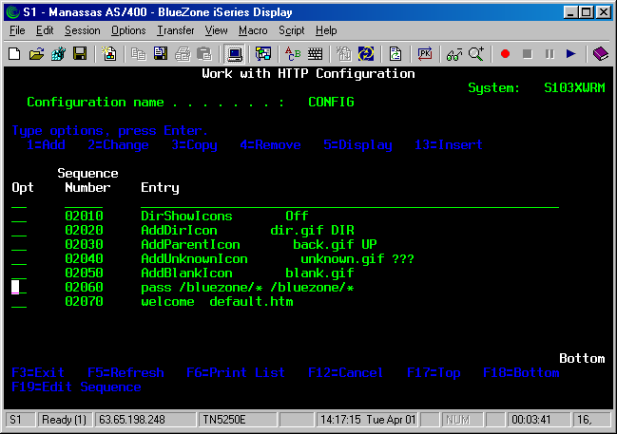
This command equates to when the URL containing bluezone is encountered, send it to the folder bluezone and execute the default page.
Refresh the server to recognize the updated configuration file. On the command line execute: STRTCPSVR
Now, when you type in the URL of the iSeries HTTP web server, the default BlueZone Web-to-Host page should launch.
From a Windows workstation, launch your browser.
Type in the URL of your web server, followed by /bluezone (or whatever you called the folder where BlueZone Web-to-Host is installed), and press ENTER.
Example: http://63.69.143.23/bluezone or http://www.myhost.com/bluezone
If your web server is set up properly, the default.htm page will launch. To see a non-working example of the default.htm page click here.
Click the Default Web-to-Host Download link. The Web-to-Host Control Module will download and install. Then, a web page with a BlueZone Launch Pad will be displayed. The Launch Pad will contain one of each of the BlueZone emulation clients.
Launch an iSeries Display session by double clicking the iSeries Display icon. Since the default configuration file does not contain any host connection information, the session will launch, but will not connect to a host.
To test your host connection, select Session:Configure from the BlueZone MenuBar. The Session Configure dialog will be displayed.
Click the Configure button on the right. Click the New button to create a new session. The Define New Connection dialog will be displayed.
Give the connection a name, then fill in Host Address, Device Name (if needed) and TCP Port. Click the OK button.
Click the OK button two more times to close the dialog.
From the MenuBar, select Session:Connect. Your session should now be connected to your host.
To save the session, select File:Save from the MenuBar.
If you have both Internet Explorer users and Netscape users, be sure to test with both browsers.
NOTE When
conducting browser tests, it’s okay to run IE and Netscape at the same
time however, you can not launch a BlueZone display session from one browser
then launch the same BlueZone display session from the other. The
second session will not launch. You
must close down the first BlueZone session (not the browser) before launching
the same BlueZone session with the other browser.
Congratulations! You have successfully installed and tested BlueZone-Web-to-Host.
How to Install the Web-to-Host Wizard for Local Publishing