Now that you have sessions up and running (see Launching Demo Sessions) you will want to start configuring sessions, saving those configurations and distributing them to your users via Java Web Manager. In this next section, we will add a session to the "demo" user.
The first step is to configure a BlueZone application and save that configuration file to your local hard drive. Consult the BlueZone Administrator's Guide for help with individual BlueZone applications. The basic procedure is to make changes to the application and then from the BlueZone ToolBar select File:Save As… and save the configuration to your hard drive with a name that you can remember. You will now have a configuration file ending in .zmd, .zmp, .zad, .zap, .zft, or .zvt.
All BlueZone configuration files use a file extension that starts with “z”. Please refer to the following table for a list of file extensions:
|
Configuration File Extension Reference |
|
|
BlueZone Component |
File Extension |
|
Mainframe Display Emulator |
.zmd |
|
Mainframe Printer Emulator |
.zmp |
|
iSeries Display Emulator |
.zad |
|
iSeries Printer Emulator |
.zap |
|
FTP Client |
.zft |
|
VT Display Emulator |
.zvt |
Open your web browser and go to the "Admin" interface. Your URL should look something like this:
http://www.yourserver.com/swm/Admin
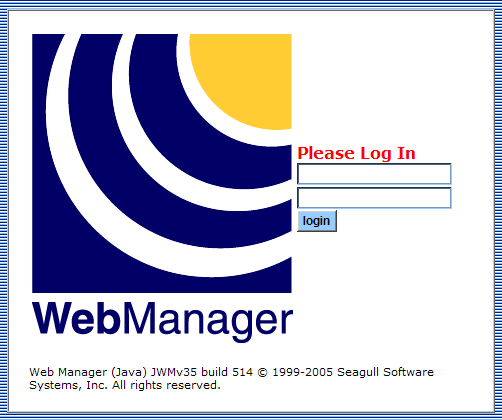
You should see the "login" screen, where you enter a Login ID and password to login to the Web Manager Administrator Interface as shown:
Two administrator accounts are preconfigured: "owner" and "admin". For this exercise you may login as either the owner or the administrator of this JWM. The password is the same as the Login ID. Login as owner/owner.
See the Administrator Interface section for more details.
The next step is to give Java Web Manager the new configuration file.
Once you have successfully logged into the Java Web Manager Administrator Interface, you will see a navigation bar on the left hand side. Click the "Files" link or icon. You should now see a list of files on the server and a drop down box at the top. Select "Upload a File" from the list and click the "Submit" button.
You should now see three text boxes labeled "Select a File" with a "Browse" button next to it. Click the top "Browse" button and navigate to the configuration file you just created. Once it is selected and its path is in the text box, click the upload button.
You should see a green confirmation box appear at the top of the screen and the file should not appear in the list.
 CAUTION! The
central mission of JWM is to distribute the BlueZone application and other
necessary files to end users. JWM
uses a version tracking scheme to determine when to automatically distribute
newer files to end users. It
is imperative to upload files to JWM using the "Files" section,
as JWM keeps track of file versions as they are uploaded to the server.
Using an
FTP program to directly place files in the "/files" directory
will circumvent this version tracking, and users will not automatically
receive the newer files.
CAUTION! The
central mission of JWM is to distribute the BlueZone application and other
necessary files to end users. JWM
uses a version tracking scheme to determine when to automatically distribute
newer files to end users. It
is imperative to upload files to JWM using the "Files" section,
as JWM keeps track of file versions as they are uploaded to the server.
Using an
FTP program to directly place files in the "/files" directory
will circumvent this version tracking, and users will not automatically
receive the newer files.
Click the "Groups" link or icon in the far left navigation bar. You should see the Groups screen for the group name "Default Group". The user "demo" belongs to this group, so we will add a session to this group. At the top of the screen there is a drop down box labeled "Action". Select "Add a Session" from the list and click the "Submit" button.
You will see a drop down box listing all six BlueZone applications. Select the application that you used to create the configuration file that you just uploaded, then click "Next Step".
On this screen, select the configuration file from the drop down box labeled "Configuration File" and click the "Next Step" button.
The session has now been added to "Default Group". Click on the "Groups" link or icon in the far left navigation bar, you should see the session you just added in the list of sessions.
The "Web Manager" logo at the top left corner is a quick link to the "Hosts" interface. Click it and you should see the Hosts Login screen. Login as demo/demo. You should now see your newly configured session in the list. Launch the session, and you will see a session window open with the configuration you just created.
Congratulations! You've just configured and distributed a user session.
Now, please read through the Administrator Interface section, it provides the information you need to be most productive with Java Web Manager.