 BlueZone VBA
 BlueZone VBA
In order to run BlueZone VBA, you must install BlueZone VBA at the same time you install BlueZone.
 SEE Installing
BlueZone VBA for more information.
Once BlueZone and BlueZone VBA have been successfully installed, BlueZone VBA is accessed by selecting Macro from the BlueZone MenuBar.
 NOTE Once
BlueZone VBA is installed, the native BlueZone Macro feature will be disabled
and replaced by BlueZone VBA.
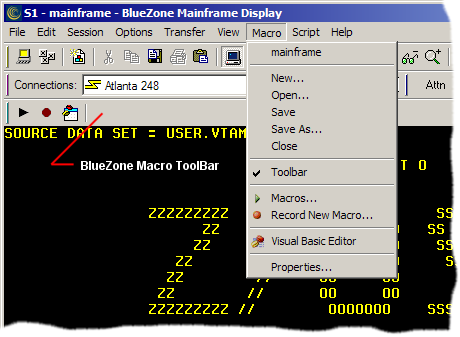
The first time you launch a BlueZone session, a VBA project (.bvp) will automatically be created using the same name as the configuration file that launched the BlueZone session. A BlueZone Macro ToolBar will appear, and the BuleZone VBA menu will look similar to the one shown here:

New is used to create a new BlueZone VBA project. You can create a project with any name you wish by selecting New from the BlueZone VBA Macro menu.
A standard Windows file dialog will be presented. Choose any name you wish and click the Open button. A BlueZone VBA project with that name will be created. The new project name will now appear at the top of the BlueZone VBA menu.
Open is used to open an existing BlueZone VBA project. Only one BlueZone VBA project can be active at a time.
Save is used to save the currently active BlueZone VBA project.
Save As is used to save the currently active BlueZone VBA project under a different name.
Close is used to "close down" BlueZone VBA. If you are not going to be using BlueZone VBA for a while you may want to close it down so it is not active.
ToolBar is a toggle used to either turn on or off the BlueZone VBA ToolBar.
Macros is used to display the BlueZone VBA Macro dialog which will display all of the existing macros in the currently active BlueZone VBA project.
Record New Macro is used to start the recording of a new BlueZone VBA macro.
Visual Basic Editor is used to launch the Visual Basic Editor or sometimes called the IDE.
Properties is used to access the configurable properties of BlueZone VBA. Currently the configurable properties of BlueZone VBA are:
Auto-Play Macro on Connect: If you want a macro to automatically run once the BlueZone session is connected to the host, check the checkbox and enter the name of the macro you wish to play. The "path" is not necessary, just the name of the macro.
Auto-Play Macro on Disconnect: If you want a macro to automatically run upon disconnect, check the checkbox and enter the name of the macro you wish to play.
Show Button Labels on Toolbar: This option toggles the text labels on the ToolBar on or off.
To create a project:
Select Macro:New from the MenuBar.
Give the project a name, and click the Open button. BlueZone VBA project names can contain spaces.
You will be prompted to the create the file. Click the Yes button.
The name of the project will be displayed at the top of the Macro menu as shown in the above example. You can now start recording macros which will be part of the newly created project.
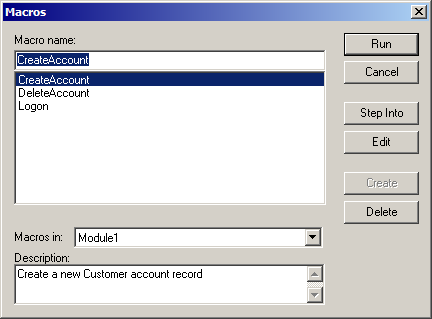
The BlueZone VBA Macro Dialog is used to run, debug, edit and delete BlueZone VBA macros.
To launch the BlueZone VBA Macro dialog, select Macros from the Macro menu. The Macros dialog will be displayed as shown:

 NOTE Only
macros that are part of the active BlueZone VBA project will be displayed.
The Run button is used to run BlueZone VBA macros.
To run a BlueZone VBA macro:
Choose the desired macro from the list and click the Run button.
The macro will now run.
The Cancel button is used to close the BlueZone VBA Macro dialog.
The Step Into button is used for debugging purposes and will launch the Visual Basic Editor in the debug mode.
To step into a BlueZone VBA macro:
Choose the desired macro from the list and click the Step Into button.
The Visual Basic Editor will launch in the debug mode.
You can start debugging the macro.
The Edit button is used for editing purposes and will launch the Visual Basic Editor in the edit mode.
To edit a BlueZone VBA macro:
Choose the desired macro from the list and click the Edit button.
The Visual Basic Editor will launch in the edit mode.
You can start editing the macro.
The Create button is used if you want to create a macro from scratch inside the Visual Basic Editor.
To create a macro from scratch:
Enter the name of the macro you want to create in the Macro name edit box.
Click the Create button.
The Visual Basic Editor will launch.
You can start creating the macro.
The Delete button is used to delete a macro.
To delete a macro:
Select the desired macro from the list.
Click the Delete button.
The macro will be deleted.
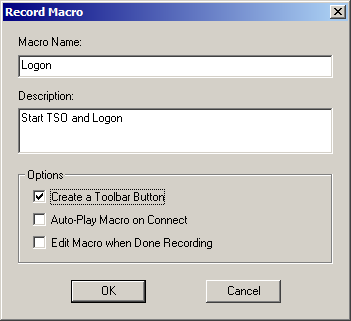
To record a macro:
Select Record
New Macro from the Macro
menu or click the Record Macro
button  on the BlueZone
Macro ToolBar. The
Record Macro dialog will be displayed
as shown:

Give the macro a name and an optional description. Macro names can not contain spaces.
Choose whether or not you want to create a Toolbar Button for this macro.
Choose whether or not you wish for the macro to Auto-Play on Connect.
Choose whether or not you want to Edit Macro when Done Recording.
Click the OK button.
Start entering the keystrokes that create the macro.
When you are finished recording, select Stop Macro Recording from the Macro menu or click the Stop Recording macro button on the BlueZone Macro ToolBar.